
This tutorial was fully rewritten in June 2023.
In this tutorial, I'm going to show you how you can easily have an image change in one column, according to the selected Elementor Accordion or Tabs element in the other column.
This works for the new containers only.
Here is a preview of what we will be creating (scroll down to see every example):
Let's get started!
First, import the Elementor template for the tabs & accordion image switcher
It's easier to start from my template. Simply import the template on your project, get it from below the iframe of the demo above.
If you just want the HTML element with the updated code (now at version 1.4), get it here:
Then, adjust as you wish with your own content
Swap the content with your own. All you need is to have as many images in one column than you have in the other column.
You also need to keep the HTML element in place. Only one HTML element is needed per page, even if you have multiple such designs on your page.
Important to note here that this works only on the front end, and not in the editor. In the editor, for ease of editing, you can see all the images normally.
How the Elementor Image Changer for Accordion and Tabs works
Here is what you need to know.
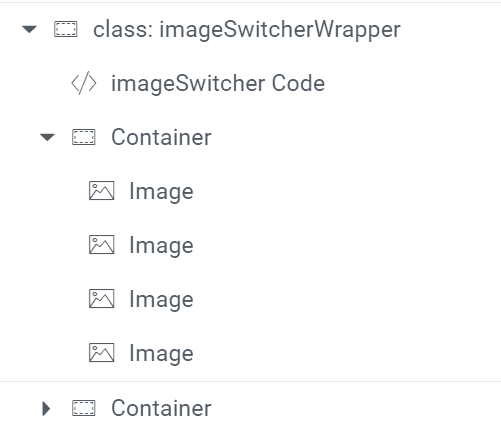
All the code required for this to work is in the imageSwitcher HTML element.
Then, the wrapper container needs the class imageSwitcherWrapper
The images need the class imageSwitcherImage
And that's it! With all of this in place, it should work fine.
A modification
If you would rather the images be occupying their entire container (ie, as if you were switching background images), change this part of the code:
body:not(.elementor-editor-active) .imageSwitcherImage:not(:first-child) {
position: absolute;
transition: opacity 0.4s;
}
To this:
<script>
/* Please login to get the code
 * The code will be for the Elementor Tabs & Accordion Image Switcher Made Easy tutorial
 * Found at this URL https://element.how/elementor-accordion-toggle-tabs-change-background-image/
 */
</script>
The change will only happen on the front end.
With that setup, you will want to give a min height to your Container that houses the images.
Finally, enjoy your image changing Elementor Accordion and Tabs!
I hope you found this helpful.
Cheers!
Note that I fully updated and rewrote this tutorial in June 2023, so the comments before that might not be relevant!
79 Responses
Tried with Toggle version, doesnt work.
Tried dual column and Inner section, Html added with script, Class allocated to Toggle widget, background image applied - Am I required to give the column with background image a class
It should be working, no class is needed for the column. do you have a link to the page where you tried to create this?
Maxime Desrosiers Very nice tutorial, thanks! Just one issue, in elementor, the accoordion has the first tab active standard, but the image is not showing automatically. You have to open en close the tab for the image to appear. Could you help me with this pelase? check at http://www.orbiz.be
Maxime Desrosiers also i see that you have put an element in your second column, so not only the background picture
Remco Dumortier Simply place an image as a background in the other column! Same one as you get by clicking the first accordion title!
Very nice tutorial, thanks! Just one issue, in elementor, the accoordion has the first tab active standard, but the image is not showing automtically. You have to open en close the tab for the image to appear. Could you help me with this pelase?
Simply place an image as a background in the other column! Same one as you get by clicking the first accordion title!
Is there a way that I could have multiple accordions - like think nested and use this methodology? Could that code be tweaked to allow that?
Yes, it could be modified to allow this! in fact, you could try it as it is... it might work right away!
Maxime Desrosiers I did. Unfortunately it did not work for me out of the box and I’m trying to figure out if I can tweak and what I would need to tweak
Stacey Bertrand You can message me via Messenger if would like further help with this!
Great tutorial, I've used it with the tabs. One problem is that the default bg in the second column is not overwritten with the new image and is always visible behind the new one.
So the new image is showing but is stacked on top of the default background. I'm trying to show different products which have a transparent background.
Is there a way to work around this? (Without losing the transparant bg of the image)
Thank you in advance!
Helo Bram! I updated the code, it should now work exactly as you want!
Hi. How do you make an icon box widget, too? https://docs.elementor.com/article/89-icon-box
Hello Kadyshev! Not certain exactly what you are asking here... do you mean how to change the background of some other column, when clicking an icon box element ?
Yes.Icon box element.
Hi Maxime Desrosiers,
I have tried with the accordion. However, on mobile, I am unable to adjust the image height in the column containing the image. Please see https://taxa.dk/bestil-taxa-4/ in mobile view.
I have tried adjusting the column margin/padding as well as the section margin/padding with no luck.
Add a 'spacer' element in that column, and adjust it's size to what you need!
Maxime Desrosiers Awesome! Thank you...
Hello,
Great tutorial. I was wondering if you could target a dynamic image element by Jetengine or similar method to house the image within it.
Yes it's probably possible... However I'd need to know more clearly what's needed to give a better answer as to how to make this.
Can i change the photos with text block?
Not with this design... I have done custom work for clients that allows this, but I don't have a tutorial for this...
Hi !
Hope you're fine.
I just tried (and re-tried) your awesome tutorial but it doesn't work. is it still working with Elementor v3.2.0 ? Thanks 🙂
Bonjour Max! You can get my download at the top of the page and import it on your website. Let me know if that works! And yes, this is working with 3.2, that is what my templates site has : https://templates.element.how/elementor-accordion-toggle.../
To get it on hover instead of click, change :
switchers[i].addEventListener('click', function () {
to
switchers[i].addEventListener('mouseenter', function () {
Hi, I tried to create multiple Toggle elements in different rows, hoping to apply same effect to all of them. However it does not works the way I want.
What I did was rename the classes to toggleswitcher1, toggleswitcher2, toggleswitcher3, toggleswitcher4 (including within the code). Then I put in multiple HTML element in the page.
Please advise if possible...
Hi Max, can you write code for two sections, like top section/inner section has image and bottom section has tab. like this https://1drv.ms/u/s!Ak7VJEF7_u3UlwaMn2diYI_FaiqE?e=WulOMt
Hey Dinesh!
Yep I can write the code for that.
great, I appreciate your quick reply.
Hi, thank you for posting this tutorial. The code does not work for me for any of the three options. Can anyone confirm they are having the same problem?
I've followed the tutorial exactly:
- Created two columns
- Insert accordion, rename CSS Classes to 'accordionswitcher' (tried for other two as-well)
- Uploaded background image to the second column
- Insert HTML anywhere on the page and copy/paste code into it. Links from the example do not change
Am I missing something?
Could you share your page with me? I will have a look what might be the problem.
I was having the same issue and then i figured out it was because i was forgetting the comma after every link in the code! i hope this was the case for you.
Hey Maxime, thank you for an amazing tutorial, I was hoping you could point me in the right direction. I want to put 4 separate accordions on the same page, currently the first one is the only one working, I've had a play with the script but it's not my forte 🙂
Thank you so much.
Hey Lauren!
Indeed these aren't written for more than 1 per page... I'd need to rewrite them to allow for this. I'm a bit busy though at the moment. I don't know when I will be able to update the code. You can write me at maxime@element.how if you need to for a project soon!
Hey Maxime, two of us have tried the code and cannot get it to work. Any help is much appreciated. http://sheric20.sg-host.com
Hey
How could I make those images vertically centered with accordion? Columns are vertically middle but pictures are with absolute position.
Hey Tauri!
Change this part of the CSS code:
left: 0;
top: 0;
bottom: 0;
right: 0;
To something like:
left:0;
top:50%;
transform:translateY(-50%);
and delete
bottom: 0;
right: 0;
Cheers!
Hi, thanks for this great tutorial! Is it possible to get the background images from a custom field?
More context: I'm building a site for somebody who is not comfortable with code. I'd love to be able to add some custom fields to the page via ACF, and have them upload their accordion images there. Then, I'd like to pull those in to your code, instead of asking them to copy/paste the urls. Is this possible?
Hey Emer!
Yes this is possible, however it would require some code modifications, and depending on your exact requirements, the method used might differ. This falls rather under custom work though, you can reach out to me if you want!
Does the code still work with the new flexbox containers ?
Hey Victor!
No it won't work as it is for flexbox containers. I will update the tutorial when the containers will officially be ready.
hi, i am facing an issue in TABs when i am adding links more than 6 it's not working kindly help me out
Hi,
Nice tutorial and code works as mentioned.
One request. Is it possible to change the code to make it working between tab switch and background image change something just like uber.com wherein if I click on different tab then the background changes.
Thanks
Yes. Replace this part of the code
var Column = document.querySelector('.accordionswitcher').closest('.elementor-column');
var rColumn;
function getRColumn(){
if(Column.nextElementSibling){
rColumn = Column.nextElementSibling.firstElementChild;
}
else if(Column.previousElementSibling){
rColumn = Column.previousElementSibling.firstElementChild;
}
};
getRColumn();
with
var rColumn = document.querySelector('.accordionswitcher').closest('.elementor-section');Hi, I have the same question. I tried the code change but it doesn't work with the section.
This is the code I used:
'use strict';
document.addEventListener('DOMContentLoaded', function () {
//Edit the background images links HERE
var links = [
'https://cdn.element.how/wp-content/uploads/2019/08/phonestickys.png',
'https://cdn.element.how/wp-content/uploads/2019/08/phonestick.png',
'https://cdn.element.how/wp-content/uploads/2019/08/phonestickys.jpg'
];
/* Don’t modivy the code below */
var rColumn = document.querySelector('.accordionswitcher').closest('.elementor-section');
// get parent element background styles
var backgroundPosition = window.getComputedStyle(rColumn, null).getPropertyValue(‘background-position’);
var backgroundRepeat = window.getComputedStyle(rColumn, null).getPropertyValue(‘background-repeat’);
var backgroundSize = window.getComputedStyle(rColumn, null).getPropertyValue(‘background-size’);
// add block with background
links.map(function(link, index) {
rColumn.insertAdjacentElement(‘beforeend’, createElement(link));
})
var _loope = function _loope(i) {
switchers[i].addEventListener(‘click’, function () {
resetBackground()
var element = document.querySelectorAll(‘.accordionswitcher-background’)[i];
element.classList.add(‘active’);
});
}
function resetBackground() {
var blocks = document.querySelectorAll(‘.accordionswitcher-background’);
for (i = 0; i < blocks.length; i++){
blocks[i].classList.remove(‘active’);
}
}
function createElement(link, className) {
var obj = document.createElement(‘div’);
obj.className = “accordionswitcher-background ” + className || ”;
obj.style.backgroundSize = backgroundSize;
obj.style.backgroundPosition = backgroundPosition;
obj.style.backgroundRepeat = backgroundRepeat;
obj.style.backgroundImage = ‘url(‘ + link + ‘)’;
return obj;
}
for (var i = 0; i < switchers.length; i++) {
_loope(i);
}
});
.accordionswitcher-background, .toggleswitcher-background, .tabswitcher-background{
position: absolute;
left: 0;
top: 0;
bottom: 0;
right: 0;
opacity: 0;
transition: opacity 0.4s linear;
}
.accordionswitcher-background.active, .toggleswitcher-background.active, .tabswitcher-background.active{
opacity: 1;
}
Hello and thank you for great tool. Unfortunately this does not work with my current setup and I cannot seem to pin point the exact issue.
Could you please take a look?
https://can-cell.com/contractor-solutions-brown-weatherguard-screws/
Hey Serena!
You are using the tab element from Essential Addons, and not the Tabs from Elementor. To make it work with EA Advanced Tabs element, change this line of code:
var switchers = document.querySelectorAll('.tabswitcher .elementor-tab-title');
to this:
var switchers = document.querySelectorAll('.tabswitcher .eael-tabs-nav li');
Cheers!
Thanks. I tried but does not seem to be working.
I can share the url as a private message.
Thanks
Hi Maxime,
Thank you once again for yet another great tutorial.
One query: is it possible to make the column/spacer with the images in it sticky? I've tried a few ways, but I can't seem to figure it out.
Similar to the rooms section on this website: https://www.thescottresort.com/
Also, and I haven't looked into this much, but the first accordion item appears active by default on the live site - can this be changed or is this the template?
Much appreciated.
Many thanks - Heather
Hello Heather!
The first accordion section is always active by default, this is Elementor native behaviour. You would need to go with the Toggle element to have it closed, but then of course it doesn't behave as an accordion anymore (ie more than one can be opened at the same time with the Toggle element).
Another option is to use the code here to close the first accordion item: https://element.how/elementor-close-accordion-on-page-load/
One query: is it possible to make the column/spacer with the images in it sticky?
Yes, it is, however extra custom code is likely required to achieve this...
Ah great thanks Maxime.
The code worked to close the accordion 🙂 Much appreciated. Surprised I missed that on your website!
Ah, custom code - can I pay you to do it or can you point me in the direction where I can learn it? I don't really have to time right now to do your full course, so looking for quick fixes! I'm pretty certain, I will do your course one day though. I want to have this website complete by end of next week - latest and I really think this will give it a simple wow factor! 🙂
Hi, just what I was looking for!
I am using tabs version and don't want any of the tabs showing. I have added the above code but there is not difference the 1st tab is still open. Can you advise?
Maxime, got that working but the image related to the 1st tab is still visable?
Hey Martin,
Simply delete these 2 lines:
/* on page load */
images[0].classList.add('imageSwitcher_isActive');
Cheers!
Hello. Thank you for the amazing tutorial. However, I can't make it work. I'm using tabs and I'm following the tutorial to the letter.
I'm using flex containers. Could this be the reason?
Hey Xanthi!
It's an honour to have you here. I'm a fan of your YouTube channel!
I updated the tutorial here with a fully rewrote and improved method for this, that now works with containers!
Cheers!
Oh thank you so much. The honour is mine!
And thank you for taking the time to update the code.
You are doing amazing work!
Hi Maxime. The example with the tabs element is not showing after Pasting. Or maybe I'm doing something wrong? I can only see the example with the Accordion.
Greetings,
Just tested and both imported fine for me...
You will need to have the proper feature enabled under WP > Elementor > Settings > Features > New Tabs elements (or something like that). This needs to be enabled.
It worked! Thanks a million! The path to activate this is WP > Elementor > Settings > Features > Nested elements.
Super thank you!
Congrats for the tutorial and all the amazing work.
Awesome, welcome!
Hello Maxim,
Great tutorial like always! But I have a question. Can you please publish the old school tutorial as a subpage? I'm not using containers because I still get some annoying issues with them. I don't feel the container function is fully usable for production sites. So therefore I'm still using old sections.
I remembered I used the tutorial from 2020 that worked perfectly with the sections, so can you maybe publish the old method as well?
Many thanks for everything!
With kind regards
Thanks for the kind words Jondo!
I'm sorry but I won't publish the old version... just because if I start doing that, it's 2x more work to keep everything working and up to date. So I switched to containers exclusively.
I do believe they are fully production ready now and have not had any issues with them for months. On my own and several clients sites.
Hope you understand.
Cheers!
Hello Maxime,
Awesome tutorial. I have a question. I replaced the images with two maps but when l try opening the maps its only one map that opens even though l click on another map.
Am using the tabs also for this.
Hey Azombi!
Try this. Change this part:
body:not(.elementor-editor-active) .imageSwitcherImage {
opacity: 0;
}
.imageSwitcherImage.imageSwitcher_isActive.imageSwitcher_isActive {
opacity: 1;
}
To this:
body:not(.elementor-editor-active) .imageSwitcherImage {
opacity: 0;
pointer-events:none;
}
.imageSwitcherImage.imageSwitcher_isActive.imageSwitcher_isActive {
opacity: 1;
pointer-events:all;
}
Cheers!
Hey Maxime
Thanks a lot, it worked very well. All the maps are clickable now.
Wish you the best, you are true superhero.
Hello Maxime!
How can I recreate the scroll effect on this text on this website with the text spilling off onto the edge of the screen?
https://www.askane.agency/agence
Hi Maxim I'm very thankful to you for this template. When I use it this caution appears: "You are currently editing an Accordion Widget in its old version. Any new Accordion widget dragged into the canvas will be the new Accordion widget, with the improved Nested capabilities." Than I use new version of Accordion an change your code line, this:
let tabsTitles = imageSwitcher.querySelectorAll('.elementor-tab-title');
to this:
let tabsTitles = imageSwitcher.querySelectorAll('.e-n-accordion-item');
It works fine. Thank you so much again for this amazing solution.
Thanks for sharing Omur!
Hi!
Can this work with the new accordion widget as well?
And can it be set to hover (not just the image should show, the accordion should open on hover and the image should chnage)?
Thanks!
Greetings Gershy!
I updated the template with support for the new accordion element!
And I also created this tutorial to open accordion items on hover: https://element.how/elementor-open-accordion-on-hover/
Cheers!
Thanks!
When a copy/pasted the template it had the old one.
I should add it again to my site, or just replace the old widget with a new one?
There should be the new Tabs, the new Accordion and the old Accordion elements in the template now. Yes please delete what you have and import it fresh.
Hi Maxime, thank you for the great tutorial, it was just what I needed!
I do have a question though - I've edited the template to my liking on a page in my site and it works fine, however when I copied it into a popup, the tabs do switch content but not the image, do you maybe have a workaround for this? I tried editing the code according to your reply to Azombi, but it did not work..
Thanks again!
Greetings Aviv!
I updated the code to work with popups. The code still needs to be on the page itself (not in the popup).
Import the HTML element (I added a direct link to it) in your page, delete the other one you had, and you should be good to go.
Cheers!