
With Elementor, it is somewhat more challenging to have a really quick website.
Elementor by itself is not the lightest of plugins, then add some fonts, icons and addons, and your website starts to become slow.
In this complete tutorial to make your Elementor website FAST, we will explore everything that can improve the page speed, in order of importance (for the most part).
Having speedy pages is paramount particularly for a website that has been created for business use.
You really don’t want visitors angrily logging out in frustration when your site starts to load at a snail's pace. It can mean losing customers and profits.
Quick note about affiliate links: whenever possible, I used an affiliate link. It helps cover the costs of running this website. I guarantee, however, that I never gave priority to any product just because I am an affiliate. My methodology is the opposite: choose my main recommendations, then if an affiliate program is available, it's win win. That's also why you won't see Bluehost recommended here, or poor products like Nitropack. ONLY what I personally use and recommend have their place on my website.
Please use these affiliate links if you would like to support my work!
Use the right theme
Your theme is no doubt, the bedrock of your site and will inevitably determine the pace of site loading.
When you have a speedy WordPress theme, your site is easier to access visitors are not driven to leave by delay and this keeps site visits steady.
Every well-made and strongly built WordPress theme will conform with current coding standards and benchmarks.
Consider making a change to a really fast WordPress theme to keep your site performance above average.
The following themes are recommended for Elementor.
Astra
This is a good example of a theme with great performance, page level controls and detailed global styles.
The Astra theme is quite popular among those creating websites with Elementor as it is deeply merged with it.
Advantages
- It has a low page size
- It is quite flexible
- It is very fast
- It is packed with many strong features and
- It gives an excellent performance even when its pro extensions have been activated in the Astra Pro theme.
Disadvantages
- Sometimes, you might find yourself fighting some theme CSS when trying to apply certain styles to certain elements. Mostly when coding in some CSS directly. If you want complete control, better opt for Hello theme.
The Astra pro version comes with a lot more features, as is naturally expected, while keeping good performance.
OceanWP
Also a very popular theme for Elementor users, Ocean WP is lightweight and designed for speedy websites.
It also provides elaborate page level controls to enable layout alterations and disable elements, among other functions.
The Ocean WP premium extension bundle provides certain distinct extensions that allows site creation flexibility.
Advantages
- Ocean WP is a multipurpose theme; it can be used to build any kind of site.
- It is SEO friendly.
- The page sizes remains small even when all extras in the extension bundle has been activated.
- Good choices of header styles, useful for those using Elementor Free
- It is free.
Disadvantages
- You might also be fighting some theme CSS at some point
- A few users reported it being somewhat buggy when used with Elementor
Hello Theme
My personal preference, the Hello theme draws its main strength from being simple.
It literally eliminates all unimportant elements to provide the most lightweight foundation.
However, it is best suited to use with Elementor Pro.
The theme comes only with basic styling, which makes it faster than most and also offers the many perks of applying a blank theme and creating your custom site parts without hurdles.
No messing about trying to override the theme's CSS.
Before you swap your current theme for the Hello theme however, be sure to create your footer, header and other parts with the Elementor theme builder.
The Hello Theme provides you with the ability to:
- Create landing pages easily
- Customize your site without hassles
Advantages
- 100% suitable for Elementor Pro.
- It is faster than most.
- Very useful in the creation of landing pages.
- Comes with very low risk of compatibility issues and you are not likely to experience any major glitches.
- It is available in the WordPress repository, hence, it can be easily installed and activated from the dashboard of a WordPress user.
- Icing on the cake is that it is also completely FREE! Awesome, right?
Disadvantages
If you are not on Pro, it is best that you look into more convenient themes that you can work with.
Alternatively, you can install Elementskit and use that plugin to create your header and footer, even without Pro.
Optimize pictures
You should ensure optimized pictures are of the smallest size attainable without losing their allure and ability to gain attention.
Fully optimized images are essential to a fast website, and this is where MANY beginner to intermediate web designers reach a major hurdle.
While not easy, optimizing pictures is in fact, a relatively uncomplicated task.
Four things are necessary for optimized images
- Properly scaled images
- Proper image format
- Proper image compression
- Proper SEO optimizations (although that won't affect load speed)
The advantages of optimizing pictures include the following:
- Speedy loading of site.
- Increased SEO ratings (This is because Google employs page speed in determining search ranks.)
- Bounce frequency is greatly reduced, increasing site visits and page visibility.
- Minimal bandwidth usage (in addition to reduced disk space on your server), which in turn minimises expenses.
- Visitors are more likely to visit other pages on your website, knowing they won't be stuck waiting.
- Conversion rates and purchases are increased due to the advantages previously enumerated.
Proper Image Dimensions
How to properly scale images
In plain language, one of the easiest and very productive methods for great picture optimization is serving scaled images.
This simply means that you are resizing your pictures to fit the display on your site.
Scaled images help to guard against using pixels exceeding that which is required.
Uploading unscaled, large sized pictures and trusting your browser to do size adjustments, as done on quite a number of sites, consumes more CPU resources and slows the website.
Where for example, your picture has an original size of 820×820 pixels and is reflected in your browser as a picture of 400×400 pixels, there will be an excess of 32,400 pixels that is absolutely not needed!
The loading speed and visibility of a page is largely affected by the kind of device used, that is, whether such a device is a desktop, a tablet or a mobile device.
Background images, particularly, are always loaded in their full resolutions, due to them being loaded from the CSS instead of the image html tag.
They don't have any srcset attribute that normal images element benefit greatly from. Therefore, background images are the most important to scale properly.
Therefore, a picture with a 3000px by 2000px resolution which looks attractive on a 27 inch monitor may not be bigger than 400 pixels on a mobile device.
You should always make sure that picture files are kept below a few hundred kilobytes for full screen images, and below 100kb for images that will occupy less than half the screen.
When they are being exported, save as “web optimized” in PNGs or JPEGs.
Editing applications such as Lightroom and Photoshop are very effective for picture size reduction. (could be lesser where clear and sharp pictures are not to be displayed on a bigger computer).
The Photoshop editor merely requires you to click on Image >> Image Size to achieve a manual adjustment of picture resolution and dimension. In the same vein, optimizing pictures for the web in Photoshop can be achieved by clicking on File >> Export >> Save for Web.
Properly scaled images are also great for SEO. It makes your site faster, and Google likes it.
Therefore it will help increase your site visibility, which means higher site visits and more profits, plus, your site visitors are happier.
Case Study
A client had a rubicks cube image that was displaying at about 470px by 300px, yet the source image was 3000px by 2000px. As it was set as a background image, the full size source image was loading. AND the image wasn't compressed properly.
After scaling down the image, and passing it through tinypng.com , it went from 1MB to 30kb, a 97% reduction! It looked exactly the same.
SEO optimization of images
Putting pictures to good use
Adding pictures to your content is very important because it helps to keep your content interesting, sustain your viewer’s attention and improve your SEO.
Pictures however, take more time to load and occupy more bandwidth on the site and this makes it essential to be certain whatever picture you’re putting up with your content has a purpose to serve.
When you attach an important picture to your material, it supplies a relevant SEO objective.
Where a relevant picture is inserted (using the appropriate picture document title and alt name), your site can get a significant increase in ratings for the keyword for which the picture and have been SEO optimized.
It is therefore crucial to select pictures carefully- pictures should not be put up for mere display purposes.
Here are a few other tips to putting your pictures to good use on your site:
- Don’t put up a picture that has nothing to do with your posts or adverts; useless pictures are a waste of bandwidth.
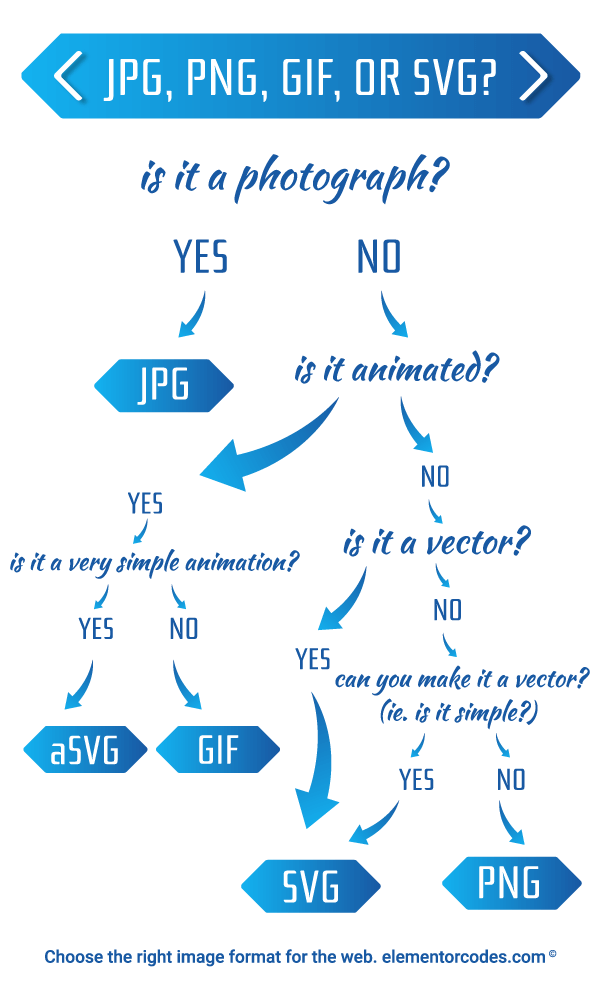
- Use the right format for every picture; know when to use JPEG images, when PNGs are more appropriate and when SVGs are your best option. This will save you a lot of stress and help you derive the greatest benefits from your uploads.
- Give your image a descriptive caption; rename it. Pictures named in random letters and figures will not help you increase site rankings on Google.
- Alt tags makes work easier for the search engines that are unable to read pixels but understand the “Alt tag language” better.
- Alt texts should be short, clear and should contain relevant keywords for optimum benefits.
Sharing Pictures on Social Media Platforms
Try setting your social media posts with applications like Rank Math or Yoast SEO. They allow title and description customization in addition with uploading pictures in the appropriate sizes for every media platform.
Proper Image Format
Choosing the right image format for your images is very important. It can make the difference between a 6MB page, and a 0.3MB page.
The newer WebP format would be the optimal one in most cases, however support isn't universal yet.
Better to use the more well known formats, such as JPEGs and PNGs, and use a plugin or CDN that will dynamically serve WebP to users that supports it (more on this later).
This flowchart should help you choose which format to use.
Here is the advantage of each image format, and when it should be used.
JPEG
JPEG is commonly tagged “lossy” because unimportant details are eliminated during the compression process.
JPEGs are wired to eliminate details that are deemed irrelevant and are not likely to draw attention in order to make pictures smaller.
It is necessary to know that saving a picture in the “lossy” format lowers the quality of the picture and quality continually deteriorates when you save an image repeatedly in this format.
JPEG is best suited for:
- Photographs
- Pictures with high-compression levels.
- Pictures with a lot of colors.
Advantages
- You can always get rid of unimportant details in your pictures.
- Allows you to work with many colors.
Disadvantages
- Logos and line drawings don’t come out good in JPEG format; they have a fuzzy appearance and end up larger in size.
- Pictures with very little color data also don’t look good in JPEG.
Note that it is possible to have drops in image quality occurring when compressing pictures in JPEG, even where a lot of colors are involved but this format still gives optimum results with very usable pictures.
PNG
PNGs are generally referred to as “lossless” due to the fact that picture sizes are reduced without eliminating any details during the picture compression process.
This sometimes makes them a preferred choice when compared with the JPEG format.
PNGs are best suited for:
- Graphics with transparent backdrops
- Smaller photos that have captions on them
- Icons and graphics involving raster images
- Screenshots
- Pictures with minimal color data
- Images with very quick transitions from one color to another and with sharp colors that need to be preserved
Advantages
- Preserves sharp colors in images
Disadvantages
- Photos with captions saved in PNG tend to be larger in size than those in JPEG format.
- When you use PNGs for images with many colors, you end up with larger file sizes.
The PNG-8; a lossless, indexed version of PNG, has proven to be more effectively used in place of GIFs but it has its own pros and cons:
Advantage
- Supports Alpha Transparency
- Super small file size. It is the format that tinypng.com uses to get such amazing results.
Disadvantages
- Animation support only seems to work with Firefox browser and is not supported in others
- Just like GIF, its storage capacity for colors is 256 colors.
The PNG-24, a lossless, direct version, effortlessly merges lossless encoding with direct color (lots of them!) just like the JPEG format.
Advantages
- Also supports Alpha transparency
- Thousands of colors can be compressed
Disadvantages
- File size upon compression would still be bigger than other formats.
- Very little visibility upgrade to its JPEG counterpart.
More often than not, PNG-8 is what you will want on your website.
SVG
SVG (Scalable Vector Graphics) is an extensible markup language-based vector image format for two-dimensional graphics with support for interactivity and animation and are most preferred to JPEGs and PNGs because of speedy loading.
SVG stands out as vector files, unlike the others which are raster in nature.
SVGs are made up of lines and curves in place of pixels.
SVGs are created through a process of presenting shapes mathematically using just a few text lines.
SVG is best suited for:
- Icons
- Logos
- Pictures with geometric shapes.
Advantages
- Perfectly preserves the sharpness of a picture, no matter the screen size
- Supports animations and transparency
- In-line SVGs saves you an extra server request
- Supports technical coloring
- Values can be edited on the fly cause they are written in XML
- Super small file sizes
Disadvantages
- Very complicated SVGs can be larger than PNG's equivalents
- Only elements that are not pixels based (photos), such as logos, simple icons and shapes that can exist as SVGs
- Can require some know-how to edit them and have them work properly
GIF
(Graphics Interchange Format)
GIFs are best suited for:
- Animations (like a video snippet)
Advantage
- It is the only image format that supports such animations (on all browsers)
Disadvantages
- Only supports a maximum of 256 different colors because it stores indexed palettes only
- Does not give great results when compared with the other picture formats (for static images)
Image optimization plugins
ShortPixel
Looking for an exhaustive, robust and regularly upgraded image compression plugin that is free (or cheap) and user friendly? This plugin is your go-to optimizer!
It is my main recommendation for image optimization, along with enabling lazy loading (more on this later).
It is a great upgrade compared with plugins such as WP smush as it delivers far better results. You could literally forget it is installed because after being setup, it won't bother you. ShortPixel is a very popular plugin; WordPress data states that it has above 200,000 active usage.
ShortPixel comes with the following features:
- Test optimization and image restore
- Bulk compression of images with a single click
- Automatic optimization upon upload (but fear not, this feature comes with a disable button too if you’d rather be in charge!)
- Allows the use of both HTTP and HTTPS websites effortlessly.
- Option to convert files in all the formats for free; even animations
- Skips pictures that have already been optimized
- Compatible with WP Engine hosted websites and all the major hosting providers
- Automatic compression of all retina images
- Optimization of thumbnails and featured images (with an option to select and exclude)
- Supports WPML and WPML media plugins
Advantages
- Works with a wide range of galleries and e-commerce plugins.
- It is free, light and easy to use.
- Can be used on different picture formats; JPEG, PNG, SVG, GIF and even PDF documents.
- Comes with a range of conversion options
- Can be used on multiple sites using just one API key
- ShortPixel is free for up to 100 images in a month!
- It offers unlimited file size
- All round the clock stellar support from its developers
You are sure to have a great user experience with this plugin, operating e-commerce websites and even as a photographer! Yes, Shortpixel keeps or eliminates EXIF data from your images and compresses them without compromising quality.
Disadvantages
- Plugin is executed “on the fly” and there is no way to access compression process details within the plugin itself.
ShortPixel offers you three levels of compression:
- Lossy compression offers a higher level of compression with reduced image quality;
- Glossy compression produces results very similar to the original image while;
- Lossless compression offers a less compression level but preserves the quality of the picture compressed.
There are two types of Shortpixel plugins
- The ShortPixel Image Optimizer(SIO) is best used for providing data to a local audience while
- The ShortPixel Adaptive Images(SAI) is for serving an international audience, thanks to its integrated CDN.
Short Pixel is your best choice if you want to achieve a quality picture compression without breaking the bank.
After the free 100 image compression quota, you can pay for more with as low as $4.99 on a monthly basis and optimize up to 5,000 pictures per month.
ShortPixel Image Optimizer (SIO) is the one you will want to use most of the time. The CDN from SAI caused a few problems for some users, so I would instead suggest getting a proper CDN like BunnyCDN (if you have an international audience).
Imagify
Advantages
- Can be used directly in WordPress
- Automatic optimization, thumbnails inclusive.
- Produces a WebP version of every optimized picture.
- Restoration of original pictures
- Attractive settings module; no multiple tabs
- Visual comparison between the compression levels so you know the right one to pick just by looking.
- Comes with a unique tool to optimize your WordPress theme. Cool!
This plugin also offers three levels of compression:
Lossless: Pretty normal compression level and will not compromise on picture quality.
Lossy: Aggressive with very minute and mostly insignificant quality alteration.
Ultra: Most compressed lossy method (lightest file, maybe-perceivable quality loss).
Imagify allows about 250 images for free optimization every month and offers a free conversion of such images to WebP version. Paid plans for Imagify plugin starts from $4.99 but pricing is on the basis of your picture upload size.
Note that upon upload, your picture will be optimized using whatever default setting has been activated, so be sure to check out the compression levels and other relevant settings before you go on with optimization.
Optimole
Quite a number of tools available in the Optimole plugin run in the background without your knowledge.
Optimole also requires you to create an account and activate with an API key. It also comes with three compression levels; High, Medium and Low.
Optimole allows you to:
- Modify plugin settings such as compression quality and image replacement.
- View optimised pictures in the dashboard.
- Monitor optimization process as import information is easily accessed.
Main features
- Simple, intuitive interface
- It is powered by a CDN which makes loading of pictures faster
- Automatic optimization
- Enables tracking and monitoring of optimization process
- Supports lazy loading and image resizing.
- Selects the proper image display for each site visitor’s browser/device.
- 100% cloud-based
- Fully compatible with page builders like Elementor and Beaver
- Downgrades image quality based on an assessment of your connectivity strength.
Advantages
- Free version
- Good for personal blogging
Disadvantages
- Free plan comes with a picture limit of 1GB.
- Accessing the plugin is bothersome as you have to go through installed plugins
- Procedure reports is not well detailed on the surface; you only get information on how small your image has been compressed to, unless you dig deeper.
The Optimole free plan can accommodate up to 5,000 visitors in a month with an unrestricted bandwidth while the paid plan starts from $10.62 which allows for 25,000 visitors with an unrestricted bandwidth.
Optimole is only recommended for smaller websites who are looking to keep expenses very low. If you can afford it, get ShortPixel.
Flying Images
This is a high performance lazy loading plugin and can load images even before they appear in the viewport.
Main features
- Supports lazy loading via javascript or in your browser’s native lazy loading.
- Comes with free, unlimited CDN
- It comes with a transparent placeholder that prevents images from flickering while they load.
- Allows instant loading of images on Internet Explorer and Javascript disabled browsers using non-script tag.
- Allows for image compression on the fly via CDN
- Allows WebP conversion on the fly via CDN
- Has a tiny Javascript; 0.7KB, gzipped, minified
Advantage
- Does not reduce user experience unlike other lazy loaders.
Disadvantage
- The free CDN might not remain free.
Flying Images offers EITHER or BOTH image compression and lazy loading.
Therefore, you can use lazy-loading from Flying Images, and ShortPixel for image compression. That would be the optimal setup.
By itself, it is also quite good, and another great totally free choice, if you are looking to save a few bucks!
Disable image hotlinking
Hotlinking basically means using images belonging to one website on another. It causes excess bandwidth usage and kills creativity.
Hotlinking is best avoided by editing the .htaccess file; a small file which is usually invisible as a result of its . prefix . It is located in the WordPress root installation directory.
.htaccess allows you to:
- Secure directories and files
- Permit or deny blank referrers
- Grant access or block individual websites
- Put up custom images to enable detection of image hotlinking.
How to edit the .htaccess file
Make a copy before editing (duplicate the file, rename it htaccess_backup) and do not make any changes except pasting the code below:
<script>
/* Please login to get the code
 * The code will be for the How To Make Your Elementor Website Super Fast: Complete Tutorial tutorial
 * Found at this URL https://element.how/elementor-performance/
 */
</script>
Before you start wondering what this is, here’s what the code above helps you to achieve:
- The first line activates the rewrite engine which in turn enables the redirection procedure.
- The second permits image viewing by blank referrers; people who make use of firewall when surfing the internet surf without referrers quite often.
- Line 3 permits image viewing by “yoursite.com” which should be replaced by your real domain name, without the www.
- You want another website to make use of your images? All you have to do is replace “your-other-domain.com” with the relevant domain name.
- The 5th line gets rid of all unauthorized images and puts the custom image in their place.
Please note that plugins are available for disabling image hotlinking, if you prefer.
Optimization plugins
Looking for tools to upgrade your site’s speed performance? WordPress cache plugins happen to be one of the most common tools to achieve this. They minimize loading duration and this goes a long way in ensuring your site users have the best experience.
Rather than demand HTML files that are constantly generated when a visitor comes on your site, Cache plugins increase a site’s loading speed by storing and producing such files when the need arises.
Common and widely used WordPress cache plugins include W3TC and WP Rocket. Swift Performance being a new addition to the caching industry.
Because this is such an important part of your optimization, I only recommend either Swift or Rocket as optimization plugin of choice. Nothing better out there.
Swift Performance vs WP Rocket
The Swift Performance comes with the following features:
- A free (lite) version that produces great results
- Its free version comes with a plugin organizer
- The pro version comes with an image optimizer
- Medium quality documentation
- A built-in database cleaner
- Costs $39 annually.
The WP Rocket has the following features:
- Higher quality documentation
- Quite simple configuration when compared to Swift
- Sucuri add-ons and Facebook Pixel
- Does not come with an image optimizer
- Does not come with a plugin organizer
- Costs $49 annually.
It is important to note that both plugins support lazy loading photos/iframes, CDN, Cloudflare, local hosting of Google Analytics, gzip compression, preloading, script merging, minification and a host of other features and are quite the same in these aspects.
Swift Performance
This plugin is one of the most recent creations available in WordPress plugin library and comes in two different versions:
- Swift Performance Lite version
- Swift Performance Pro version
The Lite version is the free version, as expected and can be found in WordPress repository while the Pro version is the premium version with price ranging from $39.
Swift Performance Pro offers users following features:
Smart Caching System
Users are able to cache dynamic pages and AJAX requests with this smart caching system, which also allows them to determine files that should be cached and those that should not.
Note: Swift Performance works excellently with Cloudflare, Varnish, Woocommerce and bbPress.
CSS and Javascript Optimization
CSS and JS minification, combining and a lot of fine tuning settings to optimize these files. You can also automatically generate critical CSS for every page.
Image Optimization
Swift Performance allows customization of image optimization with no restrictions the amount of images allowed, thus, making it a truly great value, if you don't plan on using another image optimization plugin.
Users are also allowed to determine image quality according to their specifications and can automatically optimize already present images.
However, if you truly want to get the most optimal results, I suggest you use shortpixel instead. (see above section)
Plugin Organizer
With Swift Performance, plugins are only activated when required to be used and disabled when not in use, this is also to improve site load speed.
Database Optimization
The Swift Performance plugin provides a Database optimizer, built in to remove irrelevant information such as spam comments and multiple data. This helps declutter the database and also increases site speed.
Advantages of Swift Performance For Your Site
- It helps minimize resource usage (translating to a cost saving on Cloud hosting) and server response time (TTFB)
- Enhances loading speed by eradicating render blocking (and FOIT for websites without a font loading method) in “above the fold” content. This also helps improve user experience.
- Leverages compression and browser caching, thus enhancing load duration for revisiting users.
- Uses Asynchronous optimization of Javascript
- Ability to carry out minification and concatenation of scripts and style sheets with exceptions helps site speed and efficiency.
- Advanced Granular control
- Cache dynamic content and Ajax requests
- It is fast; VERY FAST
WP Rocket
WP Rocket is currently used by over 700k websites, with a promise to “make WordPress load fast in a few clicks”. It is a WordPress performance optimization and caching plugin that can easily be used by newbies.
WP Rocket ensures an increase in site load speed through the following means:
- Compression of JavaScript, HTML and CSS files.
- Lazy loading of images
- Creation of page caches and more optimization options.
It is quite easy for newbies with very little knowledge of technology to use the WP Rocket to achieve speedy loading on the sites because this plugin is easily activated in just a few simple clicks.
WP Rocket: Pricing and Licensing Scheme
WP Rocket pricing package comes in three options:
All options are for a one year duration and users are able to access plugin and support updates for as long as their subscription to any of the plans are valid. Prompt mails are sent for renewal of plan once the active plan is close to expiring and this renewal comes with a discount.
Upon expiration of your plan, plugin and support updates are disables but the plugin itself continues to function.
WP Rocket comes with a 14-day money back guarantee.
Features and Settings
The following features of the WP Rocket plugin ensures easy optimization of all sites:
- Quick Setup
Many WordPress caching plugins comes with the headache of activating settings which are very complex even where the User is not a newbie. WP creators definitely cured this headache when the created the WP Rocket; a caching plugin that can be set up within a very short time.
- Page Caching
This is a fundamental feature of the WP Rocket plugin.
Upon a user’s first visit to a site, specific page contents are stored by the site cache so that when another user comes on the site, this stored page contents are recalled and loading speed is much faster.
Cache Settings can be customized with the WP Rocket plugin by clicking on “Settings”, located in the left side panel in WordPress.
This takes you directly to WP Rocket settings. Clicking the “Cache” option in the plugin’s settings gives you the ability to customise user caching, mobile caching and cache lifespan.
NOTE: that you have the ability to modify advanced caching rules like purging URLs and Exclusion of pages under the “Advanced Rules” option.
- Browser Caching
Browser caching allows you to store the static files of a webpage in the browsers like Google Chrome so that when a user comes on a site again such files are not required to be reloaded and this consequently increases load speed.
- Minification
Minification helps increase load speed because the plugin uses this procedure to minimize weights of Javascript, CSS and HTML files.
- Database Optimization
WP Rockets stands out from a lot of other similar plugins in that it gives you the ability to tidy up your database; eliminate bloat and decrease size. Database tidying can be executed manually or by activating a regular cleaning schedule.
Configuration can be done by going to WP Rocket Settings and clicking on the “Database” option.
The WP Rocket database optimization allows deletion of autodrafts, revisions, spam, trashed comments, posts and many more. All you have to do is tick these boxes.
The “Schedule Automatic Cleanup” option, located at the end is what allows you to plan and put regular database cleaning activities in place, either on a daily, weekly or monthly basis.
NOTE: that it is important to activate backup for your database because once it is cleaned, the action cannot be reverted.
Click on the “Optimize” button once you have put all your settings in place.
- Lazyload
More images on your site pages equals to an increase loading duration and this is where the lazyload feature comes to your rescue. Lazyload prevents loading of all images at the same time, instead, it loads images as the user scrolls down the page.
Lazyload for videos, iframes and images can be activated or deactivated in the Media option. You also have the option of activating or deactivating embeds and emojis.
7. E-commerce Friendly
The WP Rocket plugin works excellently with e-commerce plugins such as Woocommerce, IThemes Exchange, Jigoshop, WP-shop and Easy Digital Download and all the pages in WooCommerce can be automatically detected to prevent caching.
- Multilingual Compatibility
The WP Rocket plugin also works excellently with translation plugins such as Polylang, WPML and qTranslate.
Other features of the WP Rocket plugin are:
- DNS Prefetching
- Image Optimization
- Mobile Detection
- Cache preloading
- GZIP Compression
- Sitemap preloading
- Google FOnts optimization
- Developer Friendly
- Deferred JS loading.
- Facebook Pixel, Varnish, Cloudflare, Sucuri and Google Analytics support.
The Pros
- Helpful documentation including tips, tutorials and features that can guide users on activation procedure and optimum usage of the WP Rocket plugin is quite comprehensive, detailed and very useful in solving whatever issues a user might be faced with.
- WP Rocket is a paid plugin and is regularly updated by its developers 2-3 times a month to ensure it is bug free and further improve its performance levels, unlike many other plugins that are literally abandoned upon creation. The constant updating of the plugin ensures it works excellently with WordPress version updates as well.
The Cons
- WP Rocket support team can only be reached by filling the contact form or creating a ticket; there are no options of live chat or a contact number to make communication faster and this does not sufficiently deal with increasing user expectations.
- There is no free version or a free trial offer for the WP Rocket plugin, eliminating the option of testing to have a feel of how useful the plugin will be for a potential user’s needs. In order to compensate for this, there is a 14-day money back guarantee offer but either, you have to pay first to use the plugin.
Conclusion
WP Rocket provides great value for maintaining a very fast and well optimized site.
It comes with great add-ons for easier site optimization and is one of the most effective and simple WordPress caching available in the industry.
Their money back guarantee offer still enables you to test the plugin if you have doubts about paying for a plugin you are not sure will work for you.
With the level of user support, reliability and great features that come with it, WP Rocket comes highly recommended.
Greatest WordPress Hosts
Choosing the right host is paramount to having proper performance and support, according to your need.
First, a word about managed WordPress hosting vs unmanaged hosting.
Managed WordPress hosting vs unmanaged
Unmanaged hosting are companies that provide general hosting, which still permits you to install WordPress and other systems used to manage content, such as Joomla or Drupal using a control panel such as the cPanel.
However, the server is not specifically optimized for WordPress and technical WordPress queries cannot be dealt with by the support.
Managed WordPress hosts, however, offers support for your WordPress installation, and the server is fine tuned to work perfectly with WordPress.
The common activities of a managed WordPress hosting company include:
- Optimization of server settings for WordPress hosting.
- Carrying out regular malware scans and sending you threat notifications.
- Automatically backing up WordPress sites.
- Providing you with a customized dashboard for your WordPress site management.
- Offering customized WordPress support to take care of technical queries.
- Providing CDN (Content Delivery Network) for reduction of load duration.
- Offering WordPress staging area for testing and alterations before going live.
In general, if you are not super tech savvy and know quite a bit about servers, a managed WordPress host is the optimal solution.
Siteground
- Was started in March 2004.
FEATURES
- Comes with an SG optimizer plugin for the configuration of its supercacher technology.
- Free SSL and CDN with all speed and security features.
- Free Email Account, comes with all the plans available.
- Siteground hosting comes with the standard Cpanel
- On Demand Backup: With the Growbig and GoGeek plan, you have more backup options but the hosting provides you with daily backup.
- WordPress staging: Siteground provides you with access to staging environments for testing.
- Comes with deep integrations with Joomla, WordPress and Drupal, allowing thick and painless installation of these apps.
- Unlimited traffic: Website traffic is not measured.
- The Supercache feature enables you to select the level of cache you want between the Dynamic, Static, GooglePageSpeed, Memcache and the HHVM options.
PRICING AND PLAN
Siteground currently offers three plans you can pick from:
The Startup Plan.
- Costs a monthly payment of $6.95
- Hosting for 1 website
- Provides a storage space of 10GB
- Allows approximately 10,000 monthly visitors.
The GrowBig Plan
- Costs a monthly payment of $9.95
- Hosting for unlimited websites
- Provides a storage space of 20GB
- Allows approximately 25,000 monthly visitors
The GoGeek Plan
- Costs a monthly payment of $14.95
- Hosting for unlimited websites
- Provides a storage space of 40GB
- Allows approximately 100,000 monthly visitors.
SITE MIGRATION
Siteground provides automated WordPress migration with a user-friendly wordpress plugin.
SUPPORT
- Siteground provides premium 24/7 support and also has an option of expert assistance via Skype.
- Phone support is also available on siteground.
- The support team is knowledgeable, fast and friendly.
HOSTING SPECIALTY
Security
Siteground is very strict in ensuring the security of their users which is done through the following ways:
- Carrying out regular supervision of security issues on your site.
- Regularly updating WordPress installation with all themes and plugins.
Caching
- SG Optimizer automatically stores your site cache directly in the server’s memory.
- There are several layers of caching provided by the Supercacher system; Static Cache, Dynamic Cache and memcached
- Static cache is always on by default setting and is not specific to WordPress.
- Memcached and Dynamic cache provide the highest performance for WordPress but must be activated in the Cpanel by the user.
Backup
- Siteground offers an in house created backup/restore system which has proven to be faster and more effective.
PROS AND CONS
Pros
- Siteground has an uptime rate of 99.99%
- They have 5 data centers; Iowa US, Chicago US, London UK and Amsterdam NL, Singapore SG.
Cons
- Although siteground claims to offer a storage space of 10GB with their base package, you do not get the whole of the 10GB unlike in WPX hosting.
- The benefit of unlimited SSL certificates in WPX does not come with Siteground.
- It is expensive, compared with the others.
- Pricing increases at renewals
CONCLUSION
In spite of all these shortcomings, Siteground provides you with really good service and offers one of the best loading speeds in the hosting community.
Cloudways
- Started in 2011 and was revamped in 2016 as “Cloudways 2.0”
FEATURES
- Allows users to include services from cloud infrastructure providers such as GoogleCloud Platform and Amazon Web services.
- One Click SSL Certificate Management feature allows you to “do-it-yourself”
- Cloudways Ecommerce Platform allows you to establish online stores, with one free migration from your previous site.
- Comes with the CloudwaysBot, which notifies you of upgrades, backups, serverstatus, tips and recommendations.
- Built in staging that allows testing of new codes. Users can also create extra staging areas as needed.
- Cloudways comes with a modern and intuitive Cpanel
- Offers a RESTful API that allows scripting of operations.
- Comes with a Content Delivery Network (Cloudways CDN) based on Stackpath, which is easy to integrate at a minimal cost.
- Has quite a decent list of apps it supports but does not support a lot of custom built apps.
- Works with 5 top cloud providers; Digital Ocean, Linode, Vultr, Amazon Web services and Google Cloud.
PRICING AND PLAN
Cloudways currently offers four monthly plans:
$10 per month
- Storage capacity of 25GB
- Bandwidth of 1 TB
$22 per month
- Storage capacity of 50GB
- Bandwidth of 2 TB
$42 per month
- Storage capacity of 80GB
- Bandwidth of 4 TB
$80 per month
- Storage capacity of 160GB
- Bandwidth of 5 TB
There is also a Pay as You Go options that enables you to pay only for the resources you use.
SITE MIGRATION
Migration of first website to Cloudways is totally FREE.
SUPPORT
Cloudways offers the following support options:
- Live Chat
- Submission of report tickets
- Querying the CloudwaysBot
- Phone support
- Private Slack channel
- Active blog for regular post publications
- Premium Client Support that gives priority resolution on disputes but this comes at an additional fee.
- Cloudways support is available 24/7 and they are also active on major social platforms, cool right?
HOSTING SPECIALTY
Backups
- Daily backups which run automatically by default
- Data restore is just One Click away.
- Backup schedule can be modified by the user
Security
- Platform-level firewalls on every server
- Recommended Two factor authentication
- 24/7 real time supervision
- Access restriction to Cloudways API with OAuth based API keys.
SSL Certificates
- Installation of free “Let’s Encrypt SSL certificates” through user interface.
- Users can get their own certificates and install them on their sites.
PROS AND CONS
Pros
- Very fast servers
- 24/7 support and live chat
- Free SSL certificates
- One Click staging for wordpress
Cons
- While Cloudways is easy to use, you have to have certain technical experience to have a better user experience.
- Does not include email hosting.
- Can get pricey.
CONCLUSION
Cloudways is a fully-managed, scalable, cloud-based web hosting provider with flexible payment plans and several One Click integrations. Its Cloud based hosting services are made for speed, reliability and performance and they offer a free 3-day-trial for unsure clients to test out their services.
Kinsta
- Started in the year 2013.
FEATURES
- Uses the Google Cloud platform, giving users access to the same facilities used by Google for Google search and the rest of their products.
- Offers a Premium DNS that gives a faster performance.
- Containers preventing sharing of server resources and improving security.
- Offers a custom hosting dashboard instead of the regular cPanel.
- Uses a hosting stack that consists of latest technologies such as PHP 7.2, HTTP/2 and the NGINX which is far better than the Apache server.
- Offers a staging environment very similar to your site in a safe private sandbox, allowing you to test new updates and develop new features.
- Offers an included premium CDN through the keyCDN service which is easier to operate.
- A whopping 17 different data centers around the world! Yes, you read that right, plus you are able to choose a separate data center for every site.
PRICING AND PLAN
Kinsta offers a large variety of plans that you can choose from:
The STARTER Plan
- Costs a monthly payment of $30
- 1 WordPress install
- 20,000 visits
- 10GB disk space
The PRO Plan
- Costs a monthly payment of $60
- 2 WordPress Installs
- 40,000 visits
- 20GB disk space
The BUSINESS 1 Plan
- Costs a monthly payment of $100
- 5 WordPress Installs
- 100,000 visits
- 30GB disk space
The BUSINESS 2 Plan
- Costs a monthly payment of $200
- 10 WordPress Installs
- 250,000 visits
- 40GB disk space
The BUSINESS 3 Plan
- Costs a monthly payment of $300
- 20 WordPress installs
- 400,000 visits
- 50GB disk space
The BUSINESS 4 Plan
- Costs a monthly payment of $400
- 40 WordPress Installs
- 600,000 visits
- 60GB disk space
The ENTERPRISE 1 Plan
- Costs a monthly payment of $600
- 60 WordPress Installs
- 1,000,000 visits
- 100GB disk space
The ENTERPRISE 2 Plan
- Costs a monthly payment of $900
- 80 WordPress Installs
- 1,500,000 visits
- 150GB disk space
The ENTERPRISE 3 Plan
- Costs a monthly payment of $1200
- 120 WordPress Installs
- 2,000,000 visits
- 200GB disk space
The ENTERPRISE 4 Plan
- Costs a monthly payment of $1500
- 150 WordPress Installs
- 3,000,000 visits
- 250GB disk space
All plans include FREE SSL Certificates and FREE CDN for site speed.
You can also contact them if you want something bigger than the above listed plans.
NOTE that Kinsta counts all visits from the same visitor in a day as one visit. The number of visits therefore has to do with number of unique IP addresses visiting the site.
SITE MIGRATION
- Kinsta offers unlimited free migration from hosts such as Flywheel, Bluehost, Siteground and many others.
- Free migration is available on all their current plans
- Migration incurs no downtime.
- Kinsta examines your migrated site before you go live.
SUPPORT
- 24/7 support through the Intercom live chat widget which is better than the traditional live chat and even stores your chat history.
- You are attended to, by real proactive WordPress experts, no scripted lines!
HOSTING SPECIALTY
Security
- WordPress security rules and hardware firewalls.
- Offers a hack fix guarantee; cleaning your site and getting it to work normally at no cost.
- Automatically bans IPs exceeding 6 failed login attempts.
- Two factor authentication
- Multi-user permissions granting access to developers or those who just want to view billing details.
SSL Certificates
- Free SSl certificates through “Let’s Encrypt”
- Installation is achieved with just a few clicks and Kinsta offers automatic renewal so it does not expire.
Backups
- Automatic backup on a daily basis.
- Automatic backup of the live version of your site every time you push the staging version live so you can restore if need arises.
- Backup storage duration is for a period of 14 days.
- Option to pay an additional fee to get automatic backups every hour or every 6 hours.
- Option to create 5 manual backups at once.
Caching
- With Kinsta, caching is already activated at the server level.
- It implements 4 types of caching; CDN cache, Object cache, Bytecode cache and Page Cache.
- Cache can still be modified from your WordPress dashboard with options to empty the whole cache or enter URL(s) paths for automatic purge after every site update.
PROS AND CONS
Pros
- Easy to switch between staging and live sites
- Incredible uptime with no significant downtime
- Dashboard is user friendly
Cons
- Does not offer Email hosting.
- Overpriced plans when compared with other hosts.
CONCLUSION
Kinsta is definitely one of the best managed WordPress Host in the hosting industry and if you want a really fast hosting platform that offers great security and has a very responsive support team, it is advised you check this one out.
Flywheel
- Started in 2012
FEATURES
- WordPress website staging is very fast and simple with free migrations.
- Automatically backs up and updates WordPress website
- Features a local development tool for easy creation of WordPress websites
- Additional add ons to enhance your site at an extra fee.
- You can add collaborators to your Flywheel dashboard to manage the site at the hosting level.
- The “organizations” feature allows management of all of a team’s sites from one dashboard.
- Custom made database management interface
- HTTP/2.0 is available for sites hosted by Flywheel with SSL Certificates.
- You can rebrand for a better experience using the “White Label” add on at an additional fee.
- Properly designed and intuitive account and site management Cpanel
- Uses Google Cloud Platform as part of its hosting environment
- Blueprints feature created to make building of WordPress sites faster. You are able to save a theme and plugin settings and transfer to a new site with just a few clicks.
- Five data centres around the world
PRICING AND PLAN
Flywheel offers the following user plans for single sites and bulk hosting:
The Starter Plan
- Costs a monthly payment of $23 but you can make a yearly payment of $275 with one month free.
- 1 Website
- 25,000 visits
- 5GB disk space
- 50GB Bandwidth
The Freelance Plan
- Costs a monthly payment of $105 but you can make a yearly payment of $1265 with one month free.
- Up to 10 sites
- 100,000 visits
- 20GB disk space
- 200GB bandwidth
The Agency Plan
- Costs a monthly payment of $266 but you can make a yearly payment of $3190 with one month free
- Up to 30 sites
- 50GB disk space
- 500GB bandwidth
The Custom Plan
Payment is made in accordance with your personal request, determined by the number of sites, disk space and bandwidth limit requested for.
SITE MIGRATION
Flywheel offers free migration from your current site and this is done within a period of 24 hours but you have an option to obtain an 8 hour service at a fee of $49
SUPPORT
- Email support
- Live Chat
- Helpline on Skype and Hangout
- Main support is from 9am-7pm but provision has been made for a 24/7 emergency support.
HOSTING SPECIALTY
Security
- This is taken care of at the server level so that you do not require extra security plugins.
- Flywheel removes malware detected on your site at no cost
- Offers an intelligent IP blocking feature
- Encrypts data in transit and at rest
- Two factor authentication
Backup
- Nightly Backups are carried out automatically and storage duration is for a period of 30 days
- You are able to take snapshots as desired.
Caching
- Provides varnish caching optimized for WordPress sites
SSL Certificates
- Provided by “Let’s Encrypt”
- Can be installed through the Flywheel interface.
PROS AND CONS
Pros
- Great interface design and user experience
- Fantastic features worth your money
- Excellent support
Cons
- No Email hosting service
- Some plugins are not supported and this may affect performance
- Uptime checks are only available as a paid upgrade
CONCLUSION
Flywheel has a lot to offer developers, web designers and everyone looking for user friendly WordPress host with rich features. It is not the fastest on the block but is still very respectable.
Planethoster
This is another web hosting you ought to consider. Planethoster is steadily gaining reviews and recommendations in hosting communities online.
I'd mostly recommend this host for French speaking Canadians and French speaking Europeans. Their support and their entire service is mostly geared towards the French language, and their servers are close to these regions.
In the words of an user in one of the Facebook communities:
“I have Planethoster for 30+ of my websites and am super happy, I get around 100ms for TTFB and between 0.8-1.8s for full load pages”
With infrastructure on two continents and four locations; two in France and the other two in Canada, the following are some of the features Planethoster offers you:
Main Features:
- Autoinstaller for WordPress, Drupal and Prestashop amongst others.
- Double anti-malware protection with ClanAV and the web hosting’s anti-malware itself.
- Twice Daily Backups.
- Unlimited Space.
- Mod-security/WAF on all servers, eradicating the need for wall configuration.
- Free Migration.
- 24/7 Customer support via tickets, chat and phone.
- User friendly interface.
- Dedicated SSL Certificates for each domain.
- Anti DDoS protection.
- Multi and unlimited number of sites with 100% site isolation.
- World and cPanel controls.
Pricing:
Planethoster offers their services in two categories:
The World: This is basically their web hosting service and it comes in two plans at varying prices.
The Standard Plan goes for $7.26 on a monthly basis and comes with the following:
- All the features on the world platform, some of which have already been mentioned.
The VIP Plan goes for $9.68 on a monthly basis and comes with the following:
- All the features on the World platform.
- Free VPN.
- Litespeed
- Free WHOIS.
HybridCloud: Planethoster also gives you the chance to configure your own cloud server with their HybridCloud services.
This service comes in three plans at varying prices and basically has the same features with the web hosting:
The Starter Plan goes for a monthly price of $60.49 and offers the following:
- 2 CPU (Can be upgraded to 5)
- 4 GB RAM (Can be upgraded to 10)
- 60 GB space
The Recommended Plan goes for a monthly price of $102.84 and offers the following:
- 4 CPU (Can be upgraded to 10)
- 8 GB RAM (Can be upgraded to 20GB)
- 90 GB space
The Powerful Plan goes for a monthly price of $266.19 and offers the following:
- 24 CPU (Can be upgraded to 60)
- 16GB RAM (Can be upgraded to 40GB)
- 120GB space
NOTE that with Planethoster web hosting, you also have an option to configure your plan at a varying price and you get benefits for choosing their various options to make an annual payment. Most importantly, you get a 14days money back guarantee on their offers, this web hosting is definitely set to please you!
Pros:
- Pricing is reasonable.
- Amazing round the clock client support.
- Very user friendly interface.
Cons:
- Planethoster has their main language in French, with an option sometimes to read in English. While you may do fairly well without a knowledge of French, this does not erase the possibility of having comprehension issues at some point.
CONCLUSION
Definitely consider Planethoster if you are a small to medium size business in Canada or France. It offers great value, and the support is good.
WHC.CA
- Started in 2003
FEATURES
- Powered by Cpanel with Cloudlinux
- Supports over 400 applications including Joomla and Drupal
- Simple, well organised interface
- Offers a multilingual control panel
- One click installation feature
PRICING AND PLAN
Web Hosting Canada offers the following plans:
The Starter Plan
- Costs a monthly payment of C$3.89 which renews at C$5.99
- 1 Website
- Unlimited disk space
- Unlimited Bandwidth
The Pro Plan
- Costs a monthly payment of C$3.92 which renews at C$7.99
- Unlimited sites
- Unlimited disk space
- Unlimited bandwidth
The Enterprise Plan
- Costs a monthly payment of C$11.89 which renews at C$16.99
- Unlimited sites
- Unlimited disk space
- Unlimited bandwidth
NOTE that unlimited packages are in accordance with their Acceptable Use Policy, it would be a great idea to check that out before you make your choice.
SITE MIGRATION
- Like many of their counterparts, Whc.ca also provides free migration services from other hosts to Whc.ca.
- Site is tested after transfer to identify potential issues
SUPPORT
- WHC.ca has an excellent 24/7 support through an online helpdesk, email and phone support.
HOSTING SPECIALTY
Security
- Whc.ca offers built in security for the services they provide.
- Integrated security filters
- DDOS (Distributed Denial of Service) Protection with automatic detection.
- There is automatic SSL security on all your domains and subdomains.
Backup
- Provides automated off server backups.
- They offer daily backups and restore options.
- Backups have a 14-day retention period for you to restore.
PROS AND CONS
Pros
- Excellent support, client satisfaction seems to be a priority for them.
- Interface is user friendly, it’s easy to find your way around.
- They provide email hosting
Cons
- Prices go up at renewal
CONCLUSION
Whc.ca is suitable for fast, reliable and reasonably priced web hosting. Don't get the basic plan though, always go for thePro plan, as the minor price increased is worth it. Recommended only for solopreneurs kind of website, or small blogs, in Canada. For other Canadian located enterprices, go with Planethoster.
Upgrading to PHP 7+
Upgrading to PHP 7+ generally improves loading duration significantly and this can be achieved by following these simple steps:
- Login to your hosting account and locate the PHP version manager or its equivalent.
- Upgrade to PHP version 7.3
- If available, upgrade PHP to 7.4, but verify to be certain everything still works fine
- Analyse your site; run tests to determine any incompatibility issues (you can check for this using the PHP compatibility checker) and where you find incompatible WordPress plugins, you may choose to either get read of them or restore to an earlier version of PHP that is error free.
- Consistently upgrade your PHP version especially when your host provides new versions that work perfectly.
Optimizing external resources
In case you are wondering, external sources consist of anything that requires obtaining data from an outside Website, ranging from embedded YouTube videos to Gravatars and Google Analytics. These sources, particularly Google Ad sense which runs on every page, are capable of destroying your Gmetrix report.
But here are some tips for optimizing external resources:
- Use Flying Scripts plugin or Swift Performance to load these external resources only upon user interaction.
- Async Javascript: Try loading other scripts asynchronously with Async Javascript.
- Embedded YouTube Videos: Lazy load videos and replace iframes with preview images using Swift Performance or WP Rocket.
- With Elementor, lazy load videos by adding a preview image, and click the option 'lazy load'.
- Selectively load plugins using external scripts: This can be achieved by using “Asset Cleanup” or “Perfmatters” (WordPress Plugins) to disable plugins from loading on certain content.
- Google Analytics: You can host locally with CAOS Analytics, WP Rocket or Swift Performance.
- Google Maps: You should only use this on your pages when you need them. You can replace the map with a preview image, and have the map load only on click, in a light box.
- Google Adsense: Optimize this using “Cloudflare Rocket Loader” or “Ad Balancer”
- Google Fonts: You can either host fonts locally by downloading them from Google fonts, converting them to webfront files in “Transfonter” before adding them to your Elementor settings. Alternatively, you can combine Google Fonts in WP Rocket or try out Self-Hosted Google fonts/OMGF plugins.
- Disqus: Make use of the Disqus Conditional Load Plugin
Case Study
A client was loading the whole nine yards of tracking plugins: Hubspot, Google Analytics, HotJar, and a chat plugin to boot.
After installing and properly setting up Flying Scripts, his page load time when from over 5.4s all the way down to 1.4s , without losing any functionality!
Lazyloading images and videos
When you lazy load, your pictures, iframes and videos are only loaded as the visitor is scrolling down the page, instead of loading them all at once and this helps maintain your site loading speed. Embedded videos are highly recommended for lazy loading as they are very heavy elements on a page.
Use WP Rocket, Swift Performance or Flying images plugins as they work well for this.
For videos, with Elementor, lazy load them by adding a preview image, and enabling the option 'lazy load'.
WordPress specific optimizations
The following optimization steps are effective specifically for WordPress:
- Hosting Google Analytics locally with CAOS Analytics or WP Rocket
- Regular cleaning of database with WP Rocket, WP Optimize or Swift Performance Pro
- Using “Heartbeat Control” plugin to deactivate Heartbeat API
- Using a highly rated plugin like WP Rocket or Swift Performance
- Removing plugins you don't use and making use of light plugins
- Caching Gravatars with “FV”, “Optimum”, or “Harrys Gravatar Cache” plugins. Or getting rid of them.
- Using a very effective image optimization plugin such as ShortPixel
WooCommerce optimizations
WooComerce’s default function is to add additional styles, scripts and cart fragments to your website and they would naturally need more plugins to function, hence the need to go for a hosting plan such as VPS or Cloud, that would contain additional resource usage, to prevent you from exceeding the CPU limits of your host.
Here are some optimization tips for WooCommerce:
- Clear customer sessions: You might want to try clearing customer sessions if your Woocommerce site is running slow.
- Perfmatters: This Kinsta plugin makes it easy to deactivate cart fragments, scripts and styles without editing code.
- Disable Cart Fragments: Responsible for updating cart items and total but can extend loading duration so it is best advised that you deactivate cart fragments on your homepage and posts, where they are not needed. This plugin might help.
- Disable WooCommerce scripts: Because WooCommerce can load around 8 scripts on your sites, it is advisable to deactivate this.
How to set up Cloudflare CDN
A Content Delivery Network(CDN) generally is a system of distributed servers that ensure the maintenance of loading speed irrespective of a user’s location.
In order to achieve this, all user requests are handled by the CDN server closest to the user sending the request thereby reducing the distance between the site user and the site server to maintain speedy deliveries.
Important to note that only static files are served by a CDN, therefore the original server will still be accessed.
CLOUDFLARE
Cloudflare happens to be one of the best WordPress CDN and firewall services in the market but users, especially newbies are unable to make the best use of it because they believe it has a complicated set up.
Important note: Cloudflare is not just a CDN, but a complete proxy. This means that for pure site speed optimization, it is not ideal. However, for security, Cloudflare is amazing. Even the free version.
If you got security taken care of, and you just want to improve performance, what you want is BunnyCDN.
In general though, CDN's are only needed if you have an international audience. If your visitors are all located relatively close to your server, then I'd suggest against using a CDN.
However, you should still use Cloudflare as your DNS provider. It has the fastest available anywhere online, and it is completely free. Learn more about this in this article.
Comparaison of DNS speed
Cloudflare 11.35 ms
DigitalOcean 16.95 ms
Route53 (AWS) 28.34 ms
GoDaddy 42.1 ms
Google Cloud 46.84 ms
From dnsperf.com
Cloudflare Features
- Automatic caching of static content and quick delivery of dynamic content.
- Cloud based website firewall and distributed proxy server that supervises every incoming traffic to your site and blocks suspicious ones before it is too late.
- Offers free basic plan that works well for small blogs and businesses and paid plans for as low as $20 monthly payment.
Advantages
- Excellent optimization of page speed through prevention of malicious attacks.
- Focused on security and spam control.
Disadvantages
- Sometimes generates a second screen to verify security, defeating the purpose of speedy loading.
- It also creates a CAPTCHA page sometimes, asking visitors to prove they are human and this can be a big turn off for many site visitors.
Setting up Cloudflare CDN in WordPress Manually
Continue reading, or check this video!
You can take the steps highlighted below to set up Cloudflare CDN manually in your WordPress:
- Go to Cloudflare website and click the “sign up” button.
- Create your account.
- Enter your site’s URL in the allocated space
- Select a Cloudflare plan that suits your needs.
- Cloudflare displays DNS records found by their system, including your subdomain (might need to refresh the page, if it stays blank for a while). Ensure your main domain is active in Cloudflare with an orange cloud icon beside it because the ones with the gray cloud icons will bypass cloudflare.
- Once you have done this, click the “continue” button.
- You will be asked to update your nameservers by pointing them to Cloudflare nameservers. For example, if you are hosting on Domainname:
“Change ns1.domainname.com to mario.nscloudflare.com”
“Change ns2.domainname.com to tori.ns.cloudflare.com”
- Double check your nameservers and click “Save”
- Updating your nameservers and activating Cloudflare will take some time but you will get a success message on your Cloudflare dashboard once this is done.
NOTE that during this updating and activating process, your site may not be accessible to some of your users.
Configuring Necessary Cloudflare Settings
- WordPress Specific Page rules
Setting this up enables you to determine how Cloudflare functions on your site pages and this can be very useful for relevant pages like your login page. The Cloudflare free account allows you to set three page rules but an additional five rules can be added with a monthly payment of $5.
Follow the following steps to configure specific page rules:
- Click the “Page Rules” option at the top
- Click on “Create Page Rule”
- Then you can:
Secure your login page-
URL: domainname.com/wp-login.php*
SETTING: Security Level; High.
Remove WordPress dashboard from Cloudflare and activate high security-
URL: domainname.com/wp-admin*
SETTINGS: Security Level; High
Cache Level:Bypass
Disable performance
Disable Apps
Force HTTPS-
URL: http://.*domainname.com/*
SETTING: Always use HTTPS
SSL Certificate Settings
- Select the “SSL/TLS” option at the top
- If you are already using SSL, click on “full”
- Cloudflare displays a green padlock to show your site is secure
Optimization of Cloudflare for WordPress using a Plugin
Cloudflare provides a dedicated WordPress plugin for one-click wordpress optimized settings which makes it easier and faster for you to set up Cloudflare. This can be achieved through the following steps:
- Install and activate the Cloudflare plugin
- Go to Settings-Cloudflare from your admin panel
- Click the sign in option on the settings page
- Enter your Cloudflare email and API Key (which you can obtain from your account area on the Cloudflare site by opening “My Profile” and clicking on API tokens)
- After you must have entered your email and API, the Cloudflare home page is displayed on your dashboard and you can apply one-click WordPress optimization, purge cache and so on from here.
- You can also find more options by clicking on “settings”.
Other Great Optimization Plugins
WP Optimize
- Great for getting rid of spam, trash, post revisions and other junk you have in your database capable of reducing your site speed and administration panel.
- Not required if you are already using WP Rocket. (All you have to do is find an option to do these tasks in the “database” tab.)
Here’s how you use WP OPTIMIZE with another cache plugin:
- Backup your database
- Install the plugin
- Go to the WP OPTIMIZE tab
- Run the plugin with the default settings, but maybe you will want to deactivate “unapproved comments”
Clearfy
- A very important plugin for deactivating unimportant features in the WordPress core that can exhaust your CPU.
- Also great for limiting post revisions, disabling autosaves and loading fonts asynchronously.
- Comes with other speed features
- Paginates comments above 20 and disables them after a month.
Allows you to deactivate the following:
- WordPress API (from header)
- Woocommerce scripts
- XML-RPC
- RSS
- Woocommerce reviews
- WordPress generator tags
- Shortlink tag
- Emojis
- Revisions
- Autosaves
- Gravatars
- Pingback + trackbacks
- Windows Live Writer tag
- Google maps
Asset Cleanup
- Enables you to choose and deactivate plugins to prevent them from loading of specific pages or posts, reducing request and increasing speed.
You can:
- Deactivate contact form plugins on pages that don’t have contact forms.
- Deactivate social sharing plugin on all pages (except you’re a blogger)
- Deactivate slider plugins on pages that don’t use them.
- Deactivate rich snippets plugin on pages that don’t use them.
- Deactivate affiliate link management plugin on pages that don’t use them.
- Not really required if you are already using the Swift Performance Pro cache plugin and its plugin organizer.
Pre*party Resource Hints
- Permits DNS prefetch, prerender, preconnect and preload.
- Helps browsers anticipate external resources when they are being used so they can load quicker.
NOTE that you still need this plugin if you are using WP Rocket which has an option for DNS Prefetch but not preconnect. This is because prefetch only allows DNS lookup while preconnect in addition to DNS lookup, also permits TLS negotiation and TCP handshake.
Omgf|host Google Fonts Locally
- Rectifies Google Font errors in Pagespeed Insights, GT metrix and Pingdom.
(Downloads all Google fonts on your site with the Google Fonts Helper API and generates a stylesheet for it after which you should remove any requests to external sources.)
Caos|host Google Analytics Locally
- Fixes the “leverage browser caching” item in GT Metrix.
- Comes with other options.
Here’s how to get CAOS working:
- Install plugin
- Enter your Tracking ID
- CAOS adds Tracking code to your header or footer
Perfmatters
- Developed by one of the Kinsta team members
- Similar to Clearfy and Asset Cleanup
- Allows you to deactivate unimportant functions like Woocommerce scripts, styles and cart fragments
- You can choose plugins to deactivate
- Pricing costs from $24.95 yearly
Other features include:
- Deactivating Emojis
- Change WordPress login URL
- Local Analytics
- CDN Rewrite
- Remove dashicons
- Multisite support
- Deactivate Google Maps API
- Deactivate scripts per page/post.
Query Monitor
- Locates your slowest load plugins, scripts, queries and other elements that take too long to load.
- Mostly used for debugging, do not keep this turned on constantly.
Better Search & Replace
- Updates your links in bulk.
- Useful for fixing broken links
- Also works for updating links and images that show on several pages/posts.
- Great time saver.
Flying Pages
This is a really small JavaScript file that preloads links in the viewport/visible area upon identification before a user has to manually click on them.
Features of Flying Pages are as follows:
- Limiting the number of preloads per second
- Halting preloading when server is busy
- Preloading pages on mouse hover
- Preloading pages in viewport
- 1KB gzipped
- Understanding the user’s connection and preferences
Flying Pages also carries out the function of identifying links in viewport and adding them to a queue. These links are thereafter processed using a default limit of 3 requests/second, to avoid request overloading. Links are also preloaded on mouse hover where they have not been preloaded in the queue.
Another great function of Flying Pages is to identify crashed servers and slow responses. When this happens, all preloading activities are halted.
If you want your website to look as if it is super quick to your actual users (and not just the GTmetrix of the world), you definitely want this plugin installed.
Flying Scripts
Another great plugin from Gijo, author of the above mentioned Flying Images and Flying Pages.
- Delay the execution of non-critical JavaScript.
- Give more resources to critical JavaScript files.
- Reduce render time, time to interactive, first CPU idle, max Potential input delay etc.
- Reduce initial payload to browsers by reducing the no. of requests.
I got great result from using this plugin for a client, as mentioned in a case study above. (See the section about Optimizing External Resources)
Conclusion
By following even just a fraction of what is presented here, you will greatly improve your website performance. Also, never forget that UX & UI are just as important as page speed, and keep a good middle ground between speed, beauty and usability. Don't seek after super low score, just for the sake of it! While keeping in mind that Google likes quick websites, and that users spend more on quicker e-commerce sites. Yea I know, not easy to get everything right!
I also offer optimization services, if you would rather have a pro get the job done for you. Message me for more information!
10 Responses
Gran artículo, me ha sido de gran ayuda para optimizar mi página https://www.signumcomunicacion.com
Glad to hear this José !
Hi Maxime, Very good and detailed article. Thank you.
I have one question. I use Siteground to host our WP site that includes Supercache. If I were to also install Swift Performance with 'Smartcache', would these two caching products compliment each other or conflict, and better to only use one? If only one , which one is better? 🙂
Hey John! Better to use only one, indeed. the SG optimizer is quite good actually, so if that seems to work fine for you, that's great!
Personally I just prefer the more extensive options provided by Swift Performance Pro ... really get to fine tune everthing. Although it also means more work, and a deeper understanding is required.
Only way to know if you would get better results with Swift or Rocket is to try them out! and I woud say if you are satisfied with what you have now, it's probably not worth bothering about! unless you enjoy tinkering...
Hey Maxime Desrosiers thank you so much for providing this! This handbook is like stumbling upon gold for all Elementor users. So well explained and detailed! I have one question, would you still recommend scaling images before uploading them to a site or would using an image plugin such as Short Pixel be sufficient enough to properly scale images?
Thanks!
Good question Sara Zubac . Yes, scaling images is the only thing that image optimization plugins can't really help with at all, if we are talking about background images. You have to scale these yourself.
For normal images, WordPress, some themes, and some image plugins might all help with this to some extent, and generally you won't really need to care about scaling them. A normal image is one that is inserted in the HTML, with an IMG tag. For example, in Elementor, the image element.
Scaling becomes very important only when talking about images that are loaded from the CSS, which is almost always background images. In Elementor, columns and sections background images...
Excellent work! Impressive.
Thanks Nate!
Hey Maxime, thanks for the great info as always. From reading this it sounds like Flying Images is not needed with WP Rocket, but Flying Scripts would be an additional feature to add to WPRocket, can you confirm if that is correct? Also, If you're using WP Rocket, are there any other mentioned plugins that you wouldn't need as WPRocket would take their place?
You are right. Flying Images is not needed if you use wprocket, unless you would like to use their free CDN to deliver the images. Or you want to use their image compression.
In other words, Flying images lazy loading is the feature that is not needed, as WPRocket has this already.
Also, WPRocket has the features from these plugins, so they are not needed:
WP Optimize
Caos|host Google Analytics Locally
And of course, Swift Performance is not needed either, as both plugins offers the same features.