
In this tutorial we will learn how to implement a Content Switcher toggle in Elementor very easily.
The content switcher toggles between two different elements (or containers) for displaying each content at a time.
First, import the content switcher template on your page
Log in, and then import the template by either copy pasting, or downloading / importing from the buttons above.
Now, you should already have a working version of the content swticher on your page!
How the content switcher works
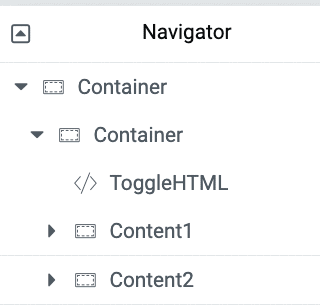
You will see three HTML elements named ToggleHTML or ToggleWitTextsHTML.
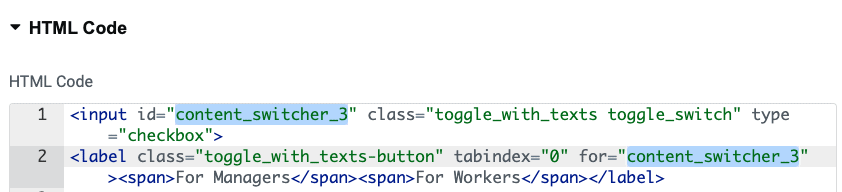
In each one of them, you will see this kind of HTML:
<input id="content_switcher" class="toggle_switch toggle_switch-ios" type="checkbox" />
<label class="toggle_switch-button" tabindex="0" for="content_switcher"></label>
Whichever two elements (or containers) follow the ToggleHTML or ToggleWitTextsHTML element, will be toggled.
Having Multiple Content Switchers Toggles
For all extra content switchers you will want on the same page, simply duplicate the HTML element that has the checkbox input and label, and move it to it's desired location.
As before, whichever two elements follow it will be toggled.
It's very important that the IDs are all unique, and to make the FOR match that new ID.
For example, I just added a '_2', '_3', '_4' in the template, to make them 'content_switcher_2', 'content_switcher_3', 'content_switcher_4'.
For and ID needs to match, in each ToggleHTML or ToggleWitTextsHTML element
The content switchers toggles styling
At the end of the template, you will find the required JS (no changes needed there) and the CSS.
You should be able to edit the colors and typography settings as you wish.
You will see there there are two <style> div, one is for the iOS style toggle, and the other is for the toggle with text in it. Delete the one that you don't need.
Finally, enjoy your content switchers!
Thanks for reading! Let me know if it works fine for you!
37 Responses
Hey Great tutorials. I think there's a bug in the code. The switcher is not displaying at all. When I set the opacity to 1 I see a little checkbox in its natural form. What might be the problem ?
Thanks!
I just tested the code and it is still working fine! Maybe you have some other CSS on your page that is intererring with my code, something that would change the display value of label elements, for example.
Legend! Thanks!
Hi, nice work, but how can I make it for specific (class or ID) on website? I want changing price and more. So I want have switcher on left side and on right side - pricelist.
Is it possible?
Goal of the tutorial was to be very simple... so to get what you want, follow the tutorial, and use two complete inner sections with anything you want in them to be changed!
Hi Maxime, could this work with Elementor templates?
Great tutorial, thx!
Hey Doug!
Well, kind of yes... You could have two 'shortcodes' elements after the toggle, both linking to your templates!
Very cool, thx again MX!
cheers
Is it possible to have the toggle show under the elements you want to switch, instead of above them?
Hey Chris!
Yes. In there code, there are two instances of 'nextElementSibling'. Change them both to 'previousElementSibling', and it will work the way you want!
Perfect... thanks!!!
Exactly what I was looking for, thanks for the amazing work as always.
Welcome!
Hello dear, first thanks for this nice tutorial,
but can you please help me to improve the code and make it work with session storage ?
I mean if the user click on the switch button the status of the switched widget will be saved during all the session of the website.
for exemple If user switch the button on ON and exit the page, and when he back again to this page , it will become always ON without need of click to the switch again !!
I hope you understand me, Thanks in advance
Very thanks for this code. This is more useful to me. Thanks a lot...
Welcome Siva!
Greetings Helen,
Could you share your URL with me? I will have a look.
Good morning
I tested with elementor pro - "loop" and "container"
the switch button works very well during a first click
but if you do it several times the placement changes
Here is a more telling film
Do you think it would be easier by adapting it to the new elementor tab widget?
https://www.awesomescreenshot.com/video/20180562?key=6bb43476173f5dae10d7027e81ad5bca
Hey Luc!
If you are toggling the visibility of container elements, change these 2 lines:
toBeShown.style.display = 'block';
shown.style.display = 'block';
to
toBeShown.style.display = 'flex';
shown.style.display = 'flex';
Cheers!
Hi great - it's ok Thanks
Hi, thanks for the tutorial but a small check box is displaying too in the container which checks to bluee when toggle is on
Greetings Muqaddas!
I updated the code to prevent this.
Cheers!
You're great bro!
Amazing
This looks amazing, will be trying it out soon. Silly question but when you mentioned above: "If you are toggling the visibility of container elements..." Do you mean if you have two containers, with elements. in between the two HTML widgets, as opposed to just 2 elements in between the HTML widgets? Just wanted to clarify because all elements reside in containers so I'm just a bit lost on the terminology "container elements".
Hey Boris!
Yes indeed that's what I mean! If the elements you are toggling are "Container" type elements, and not, say, "Heading" or "Button", or any other element.
Hi,
Thanks, this code works amazingly!!!
What would be the best way to make it nested with 2 or 3 toggles?
Let me explain better... If lets say I have three toggle switch next to each other or under each other:
- If no toggle are activated, we see Image 1.
- If only toggle 1 is activated, we see Image 2.
- If only toggle 2 is activated, we see Image 3.
- If only toggle 3 is activated, we see Image 4.
- If toggle 1 and 2 are activated, we see Image 5.
- If toggle 1 and 3 are activated, we see Image 6.
- If toggle 2 and 3 are activated, we see Image 7.
- If toggle 1-2-3 are activated, we see Image 8.
Im not sure where to nest/implement this portion in the code?
Thank you.
Greetings Sparkly!
This is really custom... it would need to be coded to your precise logic requirements. Needless to say it's beyond the intended scope of the tutorial, however if the project's finances allows, you could reach out to me for custom work. Or to any good JS dev.
Cheers!
Hi Maxime,
So I managed to do the code by myself for my request above, but thank you for the offer 🙂
Is it normal that the toggle isnt working on mobile? It showing, its sliding, but the image isnt changing?
And its the case with either my code for multiple toggles, than your code for a regular 1 toggle.
Any ideas whats the issue and how to solve it?
Thank you!
Is there a way of putting text each side, such as Plus VAT / Inc. VAT?
Thanks
Hi! Awesome tutorial. Should this work with Forms too. My scenerio is depending on what option they select with the slider, will determine which form they get. I have both forms in the same section with the slider, but the slider isnt working with them.
Nevermind, I see why it wasnt working. Had some section overtop of it. Works great and as intended now. Thanks again!
Hi Max,
Is it possible to add text before and after the toggle "monthly" and "yearly"?
Also for some reason it doesnt work with this tutorial:
https://element.how/elementor-off-canvas-navigation-menu/
Thanks
Greetings!
I just updated the tutorial with a template that includes a text version.
To make it compatible with the off canvas, please add:
window.addEventListener('load',function() {
just after the <script> tag, and then
});
just before the closing </script> tag.
Cheers!
Thanks Max looks good! is it possible to keep the nice circle toggle between them?
Awesome code! Works flawlessly. Wondering, is it possible to add any code to make it work with right and left gestures in mobile?
Meaning, make the container switch when people swipe right or left on their mobile.
Thanks again!
Doesn't work for me but I use cloudflare. Is there a setting that makes it not work?
helo
cant find the first code anymore