In this article we will learn how to zoom an article. Follow the steps to successfully zoom an article in Elementor. There are two methods of doing this:
- Image zoom with overflow
- Image zoom without overflow.
Method 1: Elementor Image zoom with overflow
Open Edit Image properties
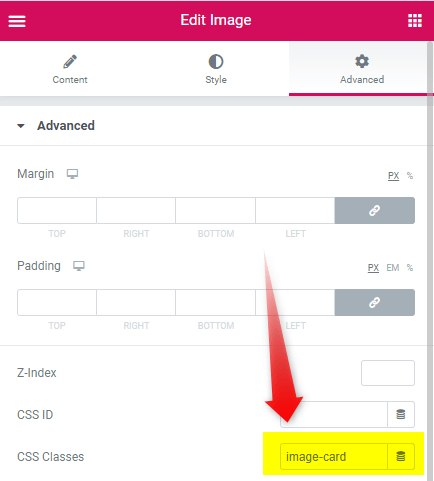
Go to the Edit Image toolbox for the image element and open the Advanced tab. In the Advanced tab change the CSS class to "image-card".
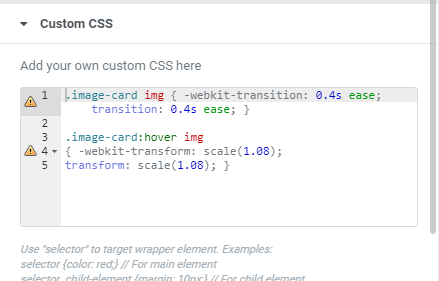
Now open the Custom CSS tab below and add the below CSS code to it.
<script>
/* Please login to get the code
 * The code will be for the Elementor Zoom Image Quickly & Easily tutorial
 * Found at this URL https://element.how/elementor-zoom-image/
 */
</script>
Here's how the zoom look like:
Method 2: Elementor Image zoom without overflow
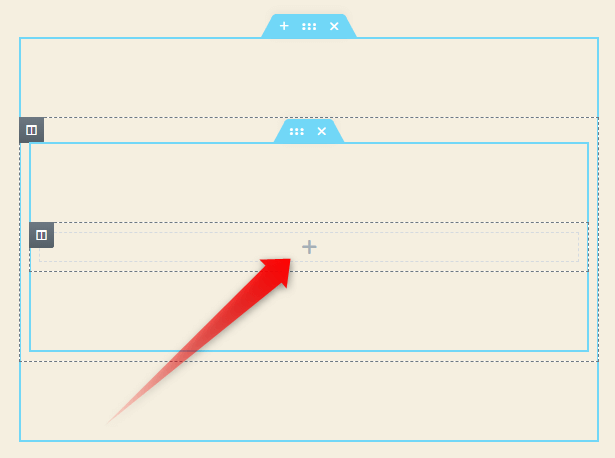
Step 1: Place the Image inside an Inner Section
Place the image element inside the inner section marked by the red pointer.
Step 2: Open Edit Image properties
Go to the Edit Image toolbox for the image element and open the Advanced tab. In the Advanced tab change the CSS class to "image-card".
Now open the Custom CSS tab below and add the below CSS code to it.
<script>
/* Please login to get the code
 * The code will be for the Elementor Zoom Image Quickly & Easily tutorial
 * Found at this URL https://element.how/elementor-zoom-image/
 */
</script>
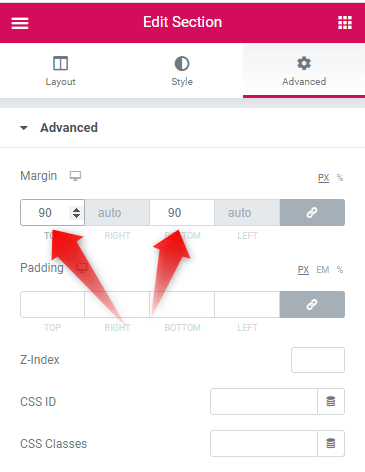
Step 3: Open the Edit Section Toolbox
In the advanced tab change the Top and Bottom margin to 90 or any preferred value suitable to your website design.
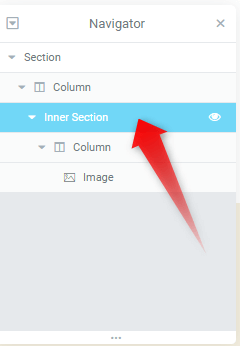
Step 4: Open the Edit Inner Section Toolbox
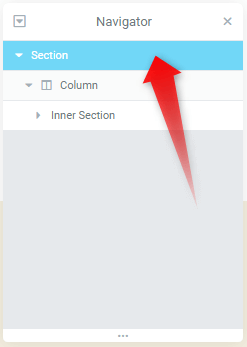
Open the Elementor navigator toolbox to access the inner section toolbox. Clicking on the inner section tab with automatically open the edit inner section toolbox to the right.
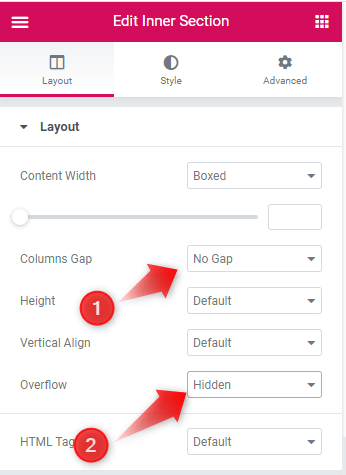
- Under the layout tab, change the Column Gap attribute to "No Gap".
- Change the Overflow attribute to "Hidden".
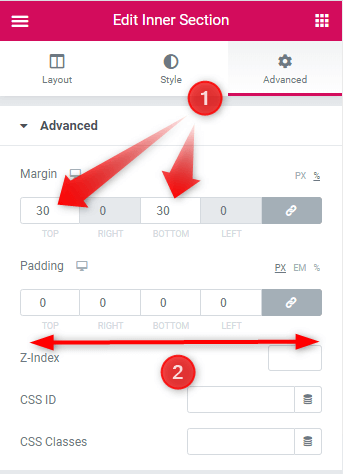
- Under the Advanced tab change the margin to 30 or any other value suitable to your website's design.
- Remove all padding from the inner section. That make their values to 0.
Here's how the zoom looks like:
Conclusion:
Alright! Now you know how to zoom an image in Elementor in two ways. This will help you to build professional looking websites quite easily.



13 Responses
Great instructional details. Thanks
You are quite welcome Jim!
hi does this work only with elementor pro? because when i open the CSS tab it tells me i have to upgrade on pro. is there any wor around to use methode 2 with normal elementor? thank you in advance
see this article https://element.how/elementor-free-custom-css/
Maxime Desrosiers thanks. unfortunately i am not so advanced. can i just coppy vour css code in the html widget or do i have to change something in the code?
Renato Ducati Place your CSS code within <style></style> tags, in the html element.
like this:
<style>
//css here
</style>
Thanks for sharing this!! I am trying to achieve something like the second way, but for the background image of the section (I have some text in front of it)
Hey Christian! The code required would be quite a bit different then... A bit out of the article's scope! Send me a message if you are interested in custom work for this tho.
Is there a way to make this work with posts widget thumbnails?
Good idea. Here is the CSS for that. Simply adjust the "scale(1.3)" to what you want!
.elementor-posts-container a.elementor-post__thumbnail__link .elementor-post__thumbnail img { transition: transform 0.4s; } .elementor-posts-container a.elementor-post__thumbnail__link:hover .elementor-post__thumbnail img { transform: translate(-50%,-50%) scale(1.3); }Thanks for the post. Your code works great. However, I would need a small tweak - I have build an inner section, but with four columns, hence four pictures. Now when I hover over a picture, I have zoom in, but zoomed in picture though bigger is under adjacent picture. I was trying with z-index, but now change. Is there any chance to show zoomed it picture always on top of adjacent pictures / columns? Thank you 🙂
Great post, easy and quick solution. I'm only having a little problem i can't solve.
https://alu.pucoo.nl/ on this page, the overflow:hidden works most sides, but not on the left side. The image comes out of it's box. Am i doing something wrong here?
Hey Pucoo!
I can't see which image you are talking about here...