How to Import CodePens to Elementor - 3 Examples

How to Import CodePens to Elementor - 3 Examples

Check out our CSS Course, made especially for Elementor users.

Table of Contents

In this article we will learn how to import CodePens into Elementor. This is a frequent query in the Elementor facebook groups, and something that can require quite a bit otf technical knowledge, so in the video, I show the entire process.

I only found those three codepens right before starting the recording of the video, by searching the facebook groups for which codepens were recently asked to migrate over to Elementor.

All the coding and troubleshooting is live, so the pace of the video is a bit slow, however you get to see the whole migration.

I suggest you make use of the video controls provided by YouTube, in particular the 'video speed' button, to keep the video interesting.

Let me know if you enjoy this kind of content, and what else you would like to see!

You can get the three completed imports in this download:

CodePen to Elementor Templates

This download gets you the following templates :

CodePen to Elementor Template

CodePen to Elementor Hover Template

Note that both of these also have the mobile-only design from CodePen 2 (refer to the tutorial).

Related tutorial : CodePen to Elementor

Name your price $

Code for the first CodePen imported into Elementor

This is the resulting code that works in Elementor, for this CodePen: https://codepen.io/spencer-hill/pen/JvMzMK

<style>

/* https://codepen.io/spencer-hill/pen/JvMzMK */
.ctr {
perspective: 1200px;
margin:16px;
}
.tilt {
position: relative;
transition: transform 0.2s ease-out;
transform-style: preserve-3d;
}
</style>

<script>

document.addEventListener('DOMContentLoaded',function(){
jQuery(function($){

$('.ctr > div').addClass('tilt');

$('.tilt').each(function(index){
$('.tilt').eq(index).on('mouseenter', function () {
animate = false;
}).on('mousemove', function(e){
var bRect = this.getBoundingClientRect();
var mX = e.pageX;
var mY = e.pageY;
var pX = Math.floor((mX - bRect.left) / bRect.width * 100);
var pY = Math.floor((mY - bRect.top) / bRect.height * 100);
var bgi = 'radial-gradient(' + bRect.width + 'px at ' + pX + '% ' + pY + '%, rgba(255,255,255,.5), rgba(255,255,255,0))';
var rotX = (pY - 50) / 5;
var rotY = -(pX - 50) / 5;
var shd = '0 ' + rotX + 'px ' + Math.abs(rotX) * 5 + 'px rgba(0,0,50,.15), 0 ' + pY / 10 + 'px ' + pY / 5 + 'px rgba(0,0,0,.25)';
var trs = 'rotateX(' + rotX + 'deg) rotateY(' + rotY + 'deg)';

$('.tilt').eq(index).css('background-image', bgi).addClass('hover');
$('.tilt').eq(index).css('box-shadow', shd);
$('.tilt').eq(index).css('transform', trs);
}).on('mouseleave', function(){
$('.tilt').eq(index).css('background-image', '').removeClass('hover');
$('.tilt').eq(index).css('box-shadow', '');
$('.tilt').eq(index).css('transform', '');
});
});
});
});
</script>

Code for CodePen 2 imported into Elementor

This is the Elementor code for this CodePen: https://codepen.io/abxlfazl/pen/VwKzaEm

<style>

/* https://codepen.io/abxlfazl/pen/VwKzaEm */

:root{
--bgColorMenu : #121212;
--duration: .7s;
}

.stickynav{
display: none;
}
@media (max-width:767px){
.stickynav{
display: block;
position: fixed;
bottom: 0;
left: 0;
width: 100vw;
z-index: 9999;
}
}

.menu{
margin: 0;
display: flex;
width: 100%;
font-size: 1.5em;
padding: 0 1.30em;
position: relative;
align-items: center;
justify-content: center;
background-color: var(--bgColorMenu);
}

.menu__item{
all: unset;
flex-grow: 1;
z-index: 100;
display: flex;
cursor: pointer;
position: relative;
border-radius: 50%;
align-items: center;
will-change: transform;
justify-content: center;
padding: 0.55em 0 0.85em;
transition: transform var(--timeOut , var(--duration));

}

.menu__item::before{
content: "";
z-index: -1;
width: 4em;
height: 4em;
border-radius: 50%;
position: absolute;
transform: scale(0);
transition: background-color var(--duration), transform var(--duration);
}

.menu__item.active {

transform: translate3d(0, -.8em , 0);

}

.menu__item.active::before{

transform: scale(1);
background-color: var(--bgColorItem);

}

.icon{
width: 2.6em;
height: 2.6em;
stroke: white;
fill: transparent;
stroke-width: 1pt;
stroke-miterlimit: 10;
stroke-linecap: round;
stroke-linejoin: round;
stroke-dasharray: 400;
}

.menu__item.active .icon {
animation: strok 1.5s reverse;
}

@keyframes strok {
100% {
stroke-dashoffset: 400;
}
}

.menu__border{
left: 0;
bottom: 99%;
width: 29vw;
height: 21px;
position: absolute;
clip-path: url(#menu);
will-change: transform;
background-color: var(--bgColorMenu);
transition: transform var(--timeOut , var(--duration));
}

.svg-container {
width: 0;
height: 0;
}

@media screen and (max-width: 50em) {
.menu{
font-size: .8em;
}
}
</style>

<menu class="menu">

<a class="menu__item active" style="--bgColorItem: #ff8c00;" >
<svg class="icon" viewBox="0 0 24 24">
<path d="M3.8,6.6h16.4"/>
<path d="M20.2,12.1H3.8"/>
<path d="M3.8,17.5h16.4"/>
</svg>
</a>

<a class="menu__item" style="--bgColorItem: #f54888;">
<svg class="icon" viewBox="0 0 24 24">
<path d="M6.7,4.8h10.7c0.3,0,0.6,0.2,0.7,0.5l2.8,7.3c0,0.1,0,0.2,0,0.3v5.6c0,0.4-0.4,0.8-0.8,0.8H3.8
C3.4,19.3,3,19,3,18.5v-5.6c0-0.1,0-0.2,0.1-0.3L6,5.3C6.1,5,6.4,4.8,6.7,4.8z"/>
<path d="M3.4,12.9H8l1.6,2.8h4.9l1.5-2.8h4.6"/>
</svg>
</a>

<a class="menu__item" style="--bgColorItem: #4343f5;" >
<svg class="icon" viewBox="0 0 24 24">
<path d="M3.4,11.9l8.8,4.4l8.4-4.4"/>
<path d="M3.4,16.2l8.8,4.5l8.4-4.5"/>
<path d="M3.7,7.8l8.6-4.5l8,4.5l-8,4.3L3.7,7.8z"/>
</svg>
</a>

<a class="menu__item" style="--bgColorItem: #e0b115;" >
<svg class="icon" viewBox="0 0 24 24" >
<path d="M5.1,3.9h13.9c0.6,0,1.2,0.5,1.2,1.2v13.9c0,0.6-0.5,1.2-1.2,1.2H5.1c-0.6,0-1.2-0.5-1.2-1.2V5.1
C3.9,4.4,4.4,3.9,5.1,3.9z"/>
<path d="M4.2,9.3h15.6"/>
<path d="M9.1,9.5v10.3"/>
</svg>
</a>

<a class="menu__item" style="--bgColorItem:#65ddb7;">
<svg class="icon" viewBox="0 0 24 24" >
<path d="M5.1,3.9h13.9c0.6,0,1.2,0.5,1.2,1.2v13.9c0,0.6-0.5,1.2-1.2,1.2H5.1c-0.6,0-1.2-0.5-1.2-1.2V5.1
C3.9,4.4,4.4,3.9,5.1,3.9z"/>
<path d="M5.5,20l9.9-9.9l4.7,4.7"/>
<path d="M10.4,8.8c0,0.9-0.7,1.6-1.6,1.6c-0.9,0-1.6-0.7-1.6-1.6C7.3,8,8,7.3,8.9,7.3C9.7,7.3,10.4,8,10.4,8.8z"/>
</svg>
</a>
<div class="menu__border"></div>

</menu>

<div class="svg-container">
<svg viewBox="0 0 202.9 45.5" >
<clipPath id="menu" clipPathUnits="objectBoundingBox" transform="scale(0.0049285362247413 0.021978021978022)">
<path d="M6.7,45.5c5.7,0.1,14.1-0.4,23.3-4c5.7-2.3,9.9-5,18.1-10.5c10.7-7.1,11.8-9.2,20.6-14.3c5-2.9,9.2-5.2,15.2-7
c7.1-2.1,13.3-2.3,17.6-2.1c4.2-0.2,10.5,0.1,17.6,2.1c6.1,1.8,10.2,4.1,15.2,7c8.8,5,9.9,7.1,20.6,14.3c8.3,5.5,12.4,8.2,18.1,10.5
c9.2,3.6,17.6,4.2,23.3,4H6.7z"/>
</clipPath>
</svg>
</div>

<script>

// Designed by: Mauricio Bucardo
// Original image:
// https://dribbble.com/shots/5619509-Animated-Tab-Bar

"use strict";

const body = document.body;
const bgColorsBody = ["#ffb457", "#ff96bd", "#9999fb", "#ffe797", "#cffff1"];
const menu = body.querySelector(".menu");
const menuItems = menu.querySelectorAll(".menu__item");
const menuBorder = menu.querySelector(".menu__border");
let activeItem = menu.querySelector(".active");

function clickItem(item, index) {

menu.style.removeProperty("--timeOut");

if (activeItem == item) return;

if (activeItem) {
activeItem.classList.remove("active");
}

item.classList.add("active");
/* body.style.backgroundColor = bgColorsBody[index]; */
activeItem = item;
offsetMenuBorder(activeItem, menuBorder);


}

function offsetMenuBorder(element, menuBorder) {

const offsetActiveItem = element.getBoundingClientRect();
const left = Math.floor(offsetActiveItem.left - menu.offsetLeft - (menuBorder.offsetWidth - offsetActiveItem.width) / 2) + "px";
menuBorder.style.transform = `translate3d(${left}, 0 , 0)`;

}

offsetMenuBorder(activeItem, menuBorder);

menuItems.forEach((item, index) => {

item.addEventListener("click", () => clickItem(item, index));

})

window.addEventListener("resize", () => {
offsetMenuBorder(activeItem, menuBorder);
menu.style.setProperty("--timeOut", "none");
});

</script>

Code for CodePen 3 imported into Elementor

Below is the Elementor code for this CodePen: https://codepen.io/samwooly/pen/qpeaNL

Also note that I fixed the offset of the 'wiping' action, to fit better with the mouse position... In the code, you will find this line here.

How to Import CodePens to Elementor - 3 Examples 1

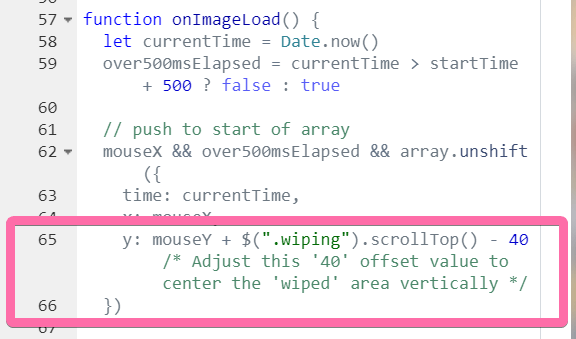
Adjust the '40' value until the wiping action is right below the mouse cursor.

<script>

/* https://codepen.io/samwooly/pen/qpeaNL */
document.addEventListener('DOMContentLoaded',function(){
jQuery(function($){

// defining variables
// c and h are canvases, f and b are contexts
let c, h, f, b, img, mouseX = null,
mouseY = null,
array = [],
startTime = 0,
over500msElapsed = true

$(".wiping").mousemove((e) => {
mouseX = e.clientX
mouseY = e.clientY
startTime = Date.now()
over500msElapsed || onImageLoad()
})

// handle mouse leaving window (set null) or resize (rebuild canvases)
$(window)
.on("blur mouseout", function() {
mouseX = mouseY = null
}).on("resize", function() {
c && c.parentNode && c.parentNode.removeChild(c)
setUpCanvases()
})

setUpCanvases()

function setUpCanvases() {
const bodyWidth = $(".wiping").width()
const bodyHeight = $(".wiping").height()
c = document.createElement("canvas")
c.width = bodyWidth
c.height = bodyHeight
c.style.position = "absolute"
c.style.top = 0
c.style.left = 0
$(".wiping").append(c)
h = document.createElement("canvas")
h.width = bodyWidth
h.height = bodyHeight
// set up contexts
if (c.getContext && c.getContext("2d") && (f = c.getContext("2d"),
b = h.getContext("2d"), b.lineCap = "round", b.shadowColor = "#000", !img)) {
// loads image (never added to DOM) so that it can be added to canvas (browser only needs to download it once)
img = new Image
// add listener before setting source so it will definitely capture the event
$(img).one("load", onImageLoad)
$(img).attr("src", "https://templates.element.how/wp-content/uploads/2021/05/rome-2.jpg")
}
}

function onImageLoad() {
let currentTime = Date.now()
over500msElapsed = currentTime > startTime + 500 ? false : true

// push to start of array
mouseX && over500msElapsed && array.unshift({
time: currentTime,
x: mouseX,
y: mouseY + $(".wiping").scrollTop() - 40 /* Adjust this '40' offset value to center the 'wiped' area vertically */
})

// trims array - removes all items older than 1s
for (let i = 0; i < array.length; i++) {
if (currentTime - array[i].time > 1000) {
array.length = i
}
}

if (array.length > 0) {
requestAnimationFrame(onImageLoad)
}

// clear canvas2 by its own width and height
b.clearRect(0, 0, h.width, h.height)

// loop through each item in array
for (i = 1; i < array.length; i++) {
const thisItem = array[i]
const lastItem = array[i - 1]

// fading stroke over time
const lineOpacity = Math.max(1 - (currentTime - thisItem.time) / 1000, 0)
b.strokeStyle = `rgba(0,0,0,${lineOpacity})`
b.lineWidth = 80
b.beginPath()
b.moveTo(lastItem.x, lastItem.y)
b.lineTo(thisItem.x, thisItem.y)
b.stroke()
}

// adjusting for canvas ratio
let imageRatio1 = c.width
let imageRatio2 = c.width / img.naturalWidth *
img.naturalHeight
imageRatio2 < c.height && (imageRatio2 = c.height, imageRatio1 = c.height / img.naturalHeight * img.naturalWidth)

// drawing the images
// draw image onto f
f.drawImage(img, 0, 0, imageRatio1, imageRatio2)
// set "destination-in" temporarily: when f and h overlap, f is kept (h acts as a mask for the image)
f.globalCompositeOperation = "destination-in"
// add h as mask
f.drawImage(h, 0, 0)
// reset to normal composite operation
f.globalCompositeOperation = "source-over"
}
}); });
</script>

Conclusion

I hope you enjoyed this tutorial. Let me know if everything worked out alright!

Element.how also provides premium tutorials showing awesome advanced designs, check them out here.

Looking for something else? Search across 2445 Elements right here:

Checkout the Elementor Addon Finder directly

Comments

Leave a Reply

BRAND NEW

CSS Course For Elementor Users

Become a CSS ninja and design exciting, quality websites that stand out in the crowd.