Get your Elementor website loading faster with this very practical tutorial!
This is essentially the same strategy I used to get this website (element.how) over 90 on Google PageSpeed Insights. For mobile.
Essentially, the goal is to get rid of everything that's loading, that we don't need.
As you are following through this tutorial, test your website after every change you make, to validate that nothing has been broken. Not every suggestion here will work for everyone.
WP Rocket is the most important part of this optimization process, so I cover it in its own tutorial: How to optimize your Elementor website with WP Rocket.
Here, I cover everything else you can and should do (or at least try) to improve your Elementor websites performance.
I kept the plugin recommendations to a minimum: Code Snippets (not required, you could also use a child theme's functions.php file) and ShortPixel IO. (repo link)
Let's get started!
Why optimizing your Elementor website is important
In a study done by Google, they found that the slower the page, the greater the bounce rate.
People just don't like to sit there waiting for the page to load. They just saw there was loads of results for their search query, they will just go back and click on another link, if yours doesn't load swiftly. We have all done this.
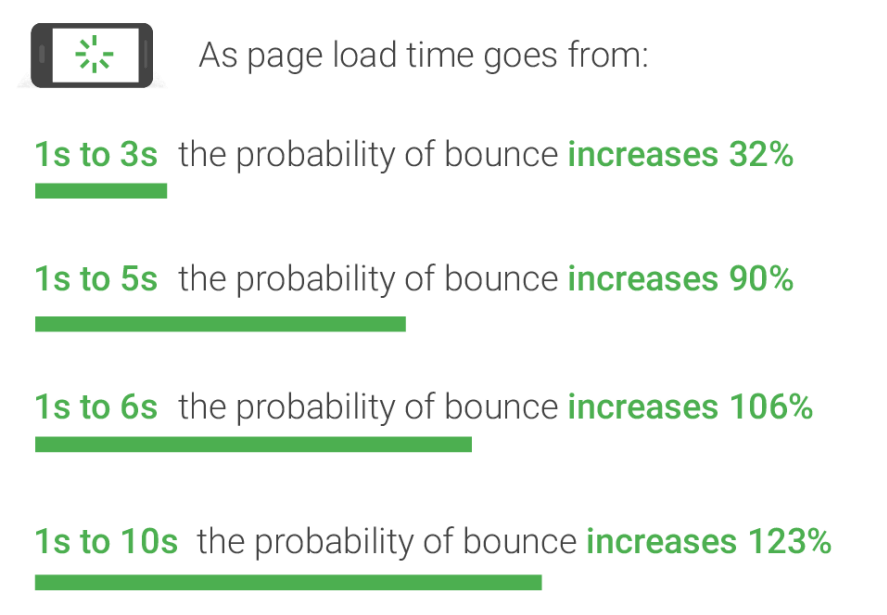
Another (lesser though still important) reason is that page speed is now a SEO ranking factor. It's a minor ranking factor, but still, it's definitely something to consider in competitive markets.
Stack everything in your favor with a fast website, as well as great content and on page / off page SEO.
The Right Elementor Settings for Performance
First, we will be adjusting the Elementor options for optimal performance and Google pagespeed insight score.
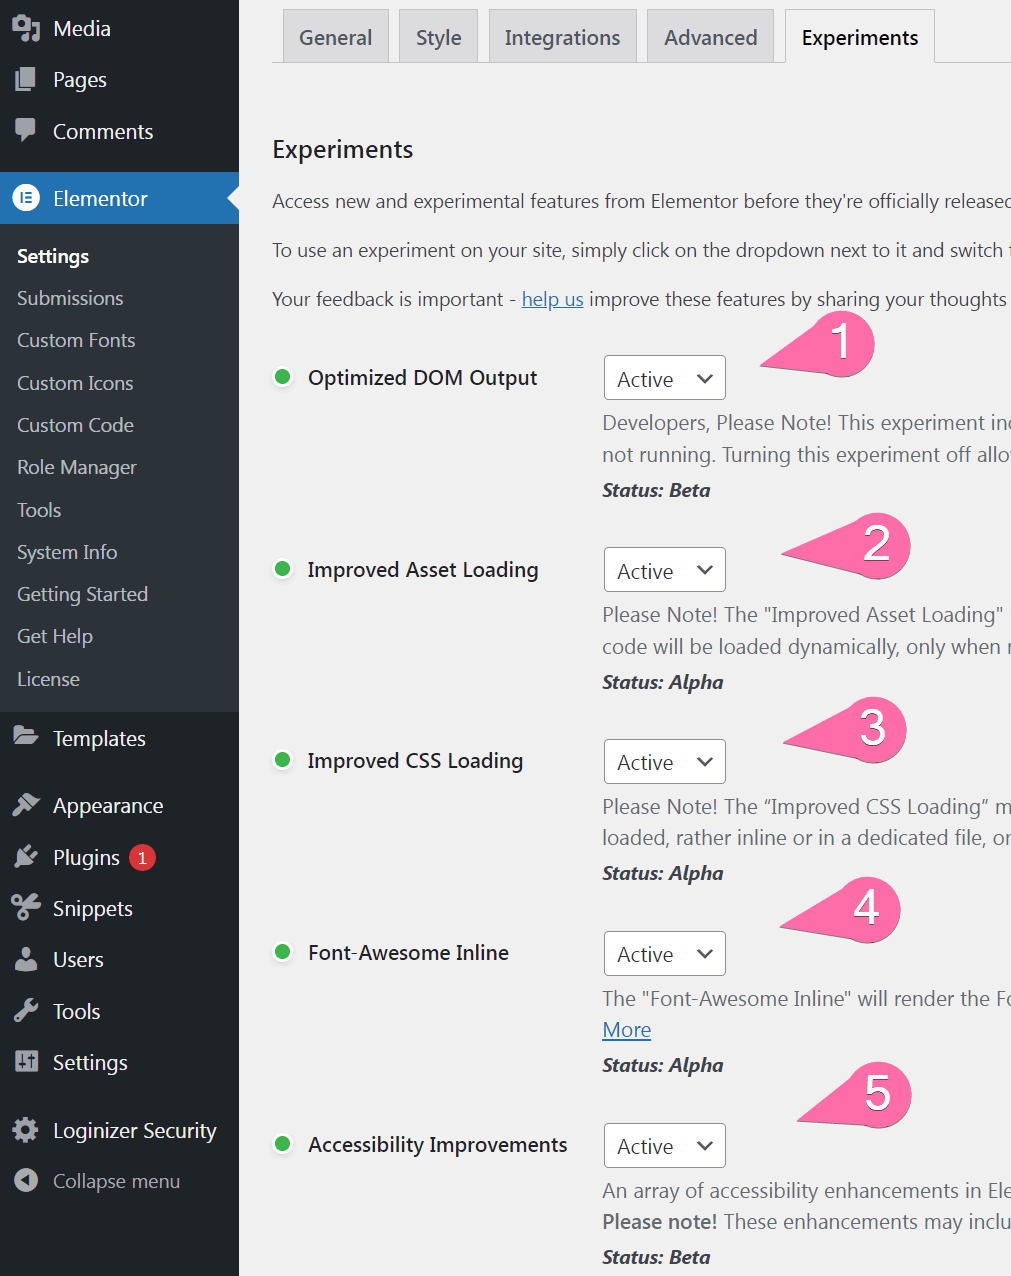
Go to Elementor > Settings > Experiments.
Note that by the time you read this, a few experiments might have moved, or be called slightly differently. You should still be able to find them easily.
Essentially, you will want to activate all of these you see in the screenshot. Active them one by one, and verify that your website is still working as intended after each one of them.
Some of these settings might break some websites, mostly older Elementor sites, and those with many addons.
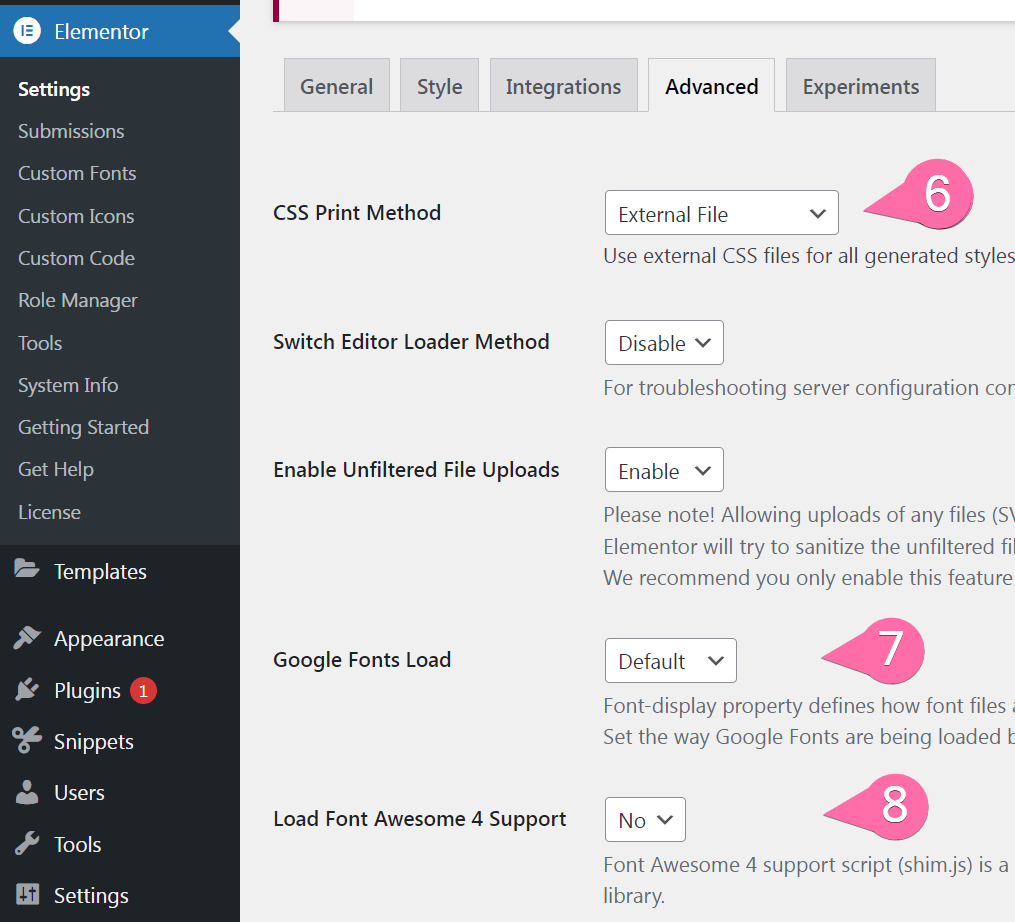
Then, let's go to the Advanced tab
6. Set the CSS Print method to External File.
7. You can try changing this to 'Swap' to improve your LCP.
8. Disable Font Awesome 4 Support. If you have font awesome 4 icons on your website though, you will need to replace them in order to keep this disabled.
Then, let's go to the general tab.
You will want to check both (9) and (10) to disable the default colours and default fonts. This will remove the global.CSS stylesheet from loading, saving 1 request and 3kb.
It will also remove CSS that could have been in conflict with your own custom styles.
Have a good look at your website after disabling these though, as in some case, you might have relied on this for styling, without realizing it.
In most cases, if you set up global styles in the Site Settings (accessible with the upper left icon while in the Elementor editor, on any page) , you should be fine:
Dequeue Useless CSS and JS files
In this part of the tutorial we will be removing useless CSS and JS files by creating a few Code Snippets.
Important: These code snippets won't work in the Elementor Custom Code feature, as it accepts HTML only, and the code snippets are PHP. You need the Code Snippets plugin, or you can also paste the code in your child theme's functions.php file.
Learn more about how to properly use the Code Snippets plugin.
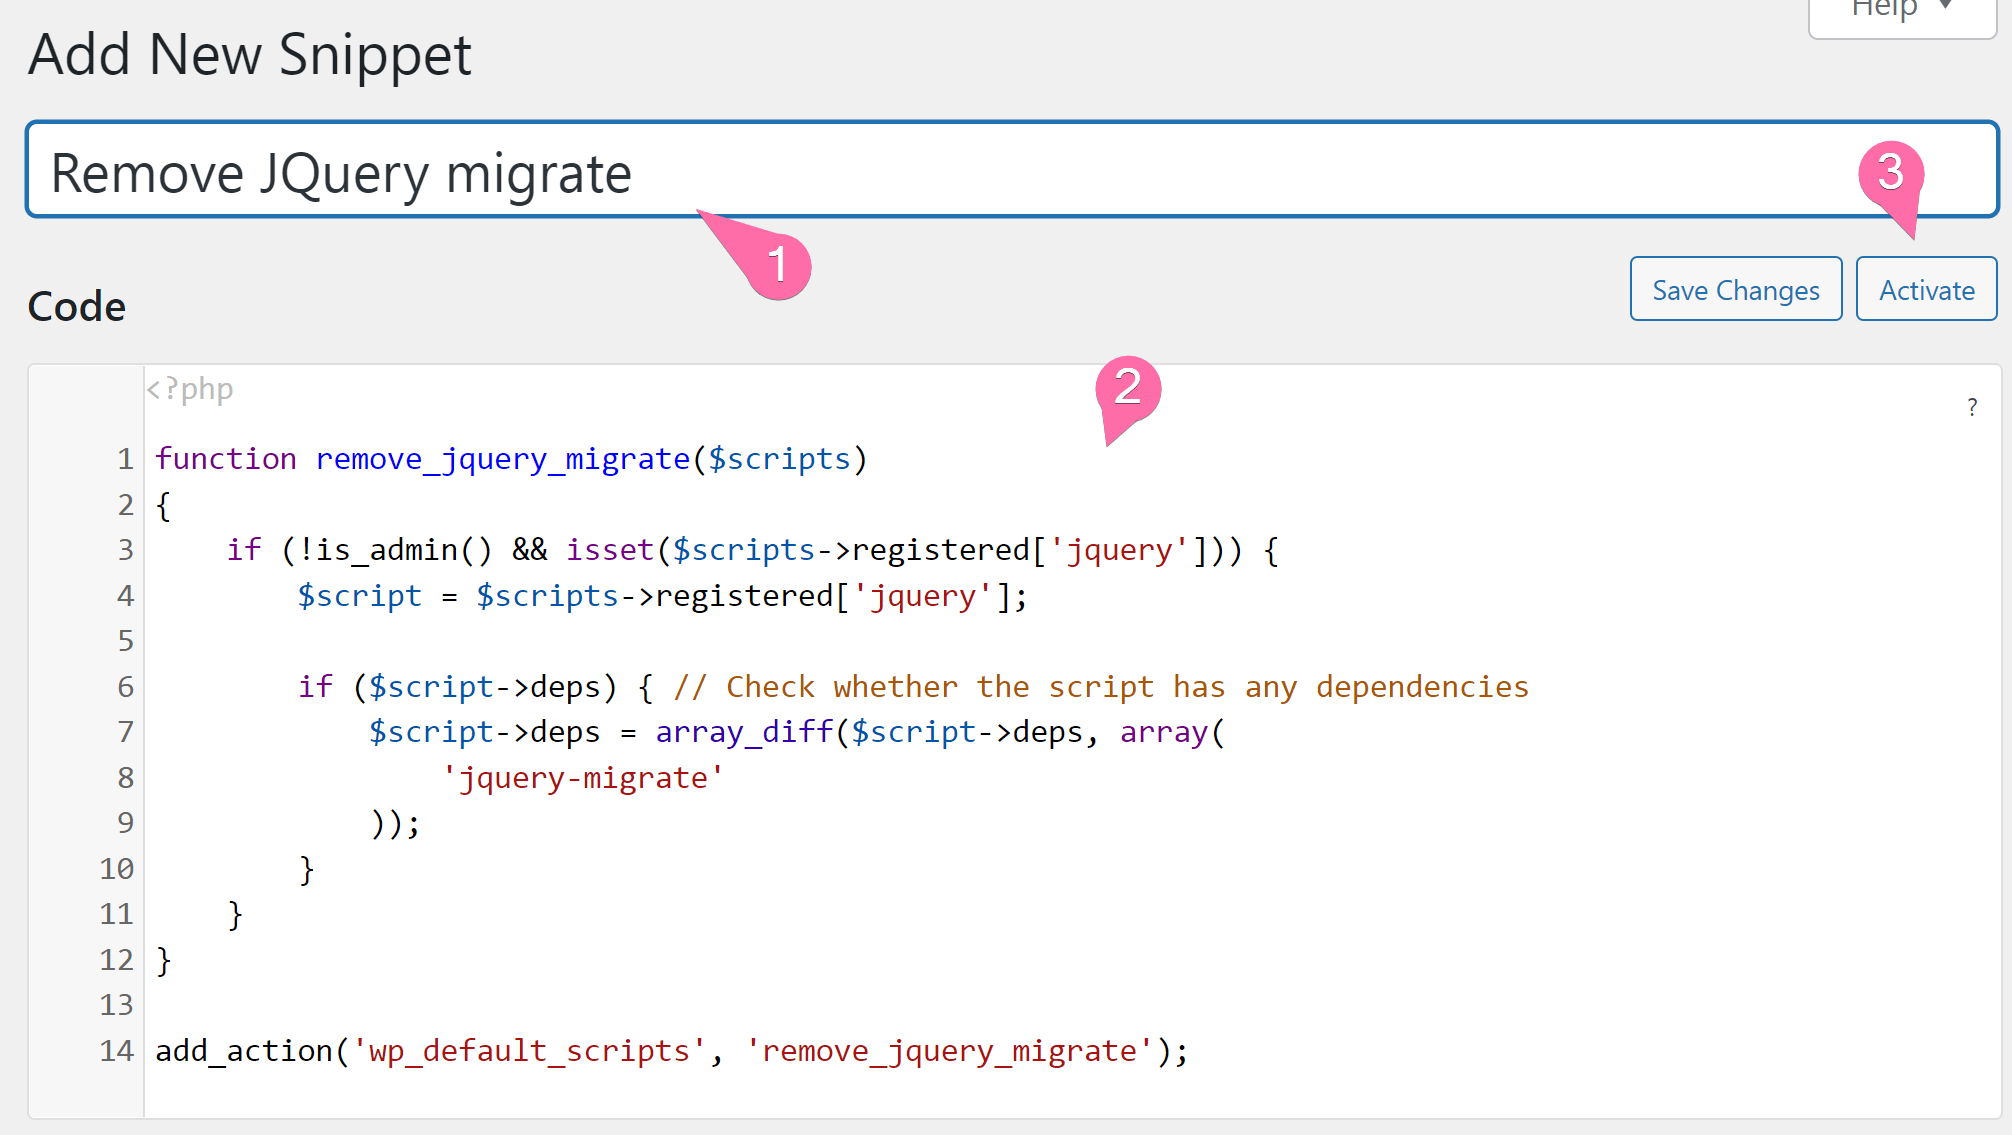
Disable jQuery Migrate
jQuery migrate should no longer be needed, yet it often is still loading. After disabling it, validate that everything still works. Some older plugin that haven't been updated in quite a while might still rely on it. For most users, this should work just fine.
Add this code in a new Code Snippet, as follow:
<script>
/* Please login to get the code
 * The code will be for the Get Your Elementor Sites a 90+ Mobile Google PageSpeed Insights Score tutorial
 * Found at this URL https://element.how/elementor-mobile-page-speed-score/
 */
</script>
Disable WP Emojis
WP Emojis is what automatically converts texts into emojis. Most websites don't use this. If yours is one of them, get rid of it!
Add this code in a new Code Snippet, as follow:
<script>
/* Please login to get the code
 * The code will be for the Get Your Elementor Sites a 90+ Mobile Google PageSpeed Insights Score tutorial
 * Found at this URL https://element.how/elementor-mobile-page-speed-score/
 */
</script>
Disable WP Embed
Don't disable WP Embed if:
- You expect others to embed your posts on their site.
- You are embeddings other's posts on your own site.
Otherwise, add the code below to disable it.
<script>
/* Please login to get the code
 * The code will be for the Get Your Elementor Sites a 90+ Mobile Google PageSpeed Insights Score tutorial
 * Found at this URL https://element.how/elementor-mobile-page-speed-score/
 */
</script>
Get rid of the blocks editor CSS files
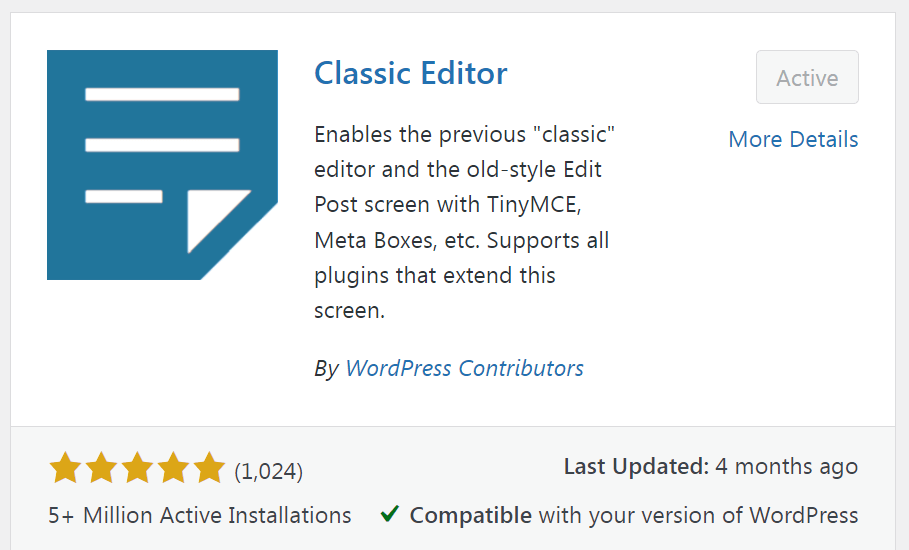
This is ONLY applicable if you are not using Gutenberg. I personally can't stand it, so I always install the Classic Editor plugin.
If you have the Classic Editor plugin installed and active, your website is probably still loading the block editor CSS files, for no good reason. Create a new code snippet and add the code below to get rid of it.
<script>
/* Please login to get the code
 * The code will be for the Get Your Elementor Sites a 90+ Mobile Google PageSpeed Insights Score tutorial
 * Found at this URL https://element.how/elementor-mobile-page-speed-score/
 */
</script>
Results so far
From following the steps above only, on a fresh Elementor install test website with Hello theme, I was able to decrease the requests from 41 to 25, and make the website significantly faster.
Here is before:
And here is after:
Optimize Images with ShortPixel Image Optimizer
Now, let's optimize the images!
My plugin of choice for this is ShortPixel Image Optimizer.
It will dynamically deliver AVIF & WebP version of the images to the browsers that supports it, and PNGs & JPEGs to those that don't. So every visitor will see your images.
It does a really good job at compression, while preserving the visual appeal. It's regarding as the plugin of choice for image optimization.
You will want ShortPixel Image Optimizer.
Be aware that it's not free though, after your 500 free credits are spent. It's pretty cheap however, looking at a few dollars per year in most cases.
You can purchase credits here.
After installing and activating, let's adjust the settings. Most of them are fine as they are. You can keep the defaults. Here are the few that I recommend changing:
Change the compression level to either Lossy or Glossy. Glossy is a good middle ground for quality and compression.
The other settings in the General tab may be adjusted as you see fit.
After this, in Advanced, I recommend enabling Create WebP, Create AVIF and Deliver.
Which option you will choose in Deliver will depend on your particular server and setup. Generally speaking, if your server can serve WebP or AVIF through .htaccess, that's ideal.
The rest of the settings in Advanced tab may be set to fit your needs.
Finetune WP Rocket for Optimal Performance
As I wrote in the introduction, WP Rocket is the most important part of this optimization process, so I cover it in its own tutorial: How to optimize your Elementor website with WP Rocket.
And here is why WP Rocket is the greatest optimization plugin.
Interested to learn even more?
Are you interested into learning even more about speed optimization? Would you like to truly master this area? Definitely checkout Shay Toder's course.
Shay is a worldwide authority on optimization, and he is the winner of 1st place in 2019, 3rd place in 2020 & 1st place in 2021, in a international WordPress Performance Contest.
Conclusion
Hopefully this tutorial helped you improve your sites performance! Let me know the results you are getting!







16 Responses
As always, thanks for useful tips!
One thing: Is it necessary to install the "Add class to Elementor Image"-plugin or is it just for convenience? I mean, it's possible to set a class on the elementor-widget, so you can just define a longer selector.
Great question Aske!
Unfortunately, yes it is necessary. And here is why: If you use a compound selector, like '.no-lazy-load img', where we would have given the 'no-lazy-load' class to the container element of the image, in other words, what happens by default when we add a class under Advanced > CSS Classes, then instead of rendering it on page load, first the JavaScript from ShortPixel would need to run, find out that this image is excluded from lazy loading, and load it.
So the image would load only after the JS has run, instead of when it's encountered in the HTML. That would be really troublesome for the LCP.
When the class is directly to the image, it is rendered normally, when encountered, load much earlier.
Thanks for clarifying 🙂
Hi Maxime, a very helpful guide, but I'm also having an issue with lazy load (I'm using SPAI and WPRocket). The class name plugin you mention only seems to help with the image widget of Elementor. However, I'm seeing lazy load above the fold for blog posts, Author box and Call to action. The class name field doesn't appear here. Whyt can I do to avoid lazy loading there? It's especially prevalent on mobile, as all images only get loaded fully when I scroll the page.
this is the page in question: https://www.neumann.digital/blog/
Thanks a lot in advance for your help.
Hey David!
Yes, this is a problem. Ideally Elementor would add the option to add classes directly to the img in every element.
However, the only option I see for now is to use a compound selector, and to exclude the shortpixel JS from Delay JS in WP Rocket. Enter this to exclude it : 'spaiCalculateBgClipResize' , without the '.
So in the excluded selectors for lazy loading, also add this : '.no-lazy-load img'. And then give your element the class 'no-lazy-load', under Advanced > CSS Classes.
Let me know if that all works! Cheers!
Hi Maxime, I did as you described, but I'm not seeing any change on mobile. I will ask ShortPixel if they have any idea. On the plus side, I managed to get the Lighthous perdomance up quite a bit.
I'm still having an issue with this page on desktop:
https://www.neumann.digital/newsletter/
upon first load on desktop, all the styles are gone. When I reload, they appear. What could be the reason for this behaviour? I'm not observing it on mobile (only the lazy load issue persists).
Hey David!
It's not properly excluded from the delay JS... I can see the file isn't loading on page load, and only after user interaction. Try to exclude it by adding the file name then: spai-lib-bg.1.0.min.js , or just spai-lib-bg . So that future version will be excluded as well.
After taking a break from this issue, I tried again last night with short Pixel AI and I just can't get it to work. Lazy Load is always applied to images above the fold and It messes with my CSS. I deactivated shortpixel and went back to Imagify now, with the hope that it plays nicely with WP Rocket. Thanks for your help!
Hey! For the "Remove JQuery migrate" code snippet, what location should I publish the code to? , - Start, or - End ?
Hey Ben!
When I refer to adding these as Code Snippets, I'm specifically referring to the Code Snippets plugin, as it accepts PHP.
Elementor Custom Code won't work, as it accepts HTML only.
Hi Maxime, your article was amazingly helpful for my site! I experienced tremendous improvement and my score went to 96. Thank you. However, I am now experiencing a problem in that my Showcase-IDX plugin is not working on the home page at texaspropertysisters.com. I'm pretty much a novice at all of this so I'm wondering if you can point me in the right direction toward a fix?
Thanks for your help!
Hey Julie!
The first thing I would try is to disable 'Minify JS'. Now, you are getting an error in the console, and it suggests it might be due to minification.
If that doesn't work, then you might have ato exclude your IDX javascript file from being delayed. It will defiintely slow your site though as that file is quite large. But, better a working website that's not as fast than the alternative...
You can send me a message at maxime@element.how for further support!
Maxine,
Disabling Minify JS worked! Thank you so much for the help!
Such a great post - I come back to almost every time I am building a new website! Thank you!
Thank you Heather! Really appreciated!
My site crashes when using your code snippets, any advice?