
In this tutorial, I'm going to show you how to use a SVG duotone filter created in the Block Editor and apply it anywhere in Elementor.
This could be used as Elementor image filter effect, or even on an entire section.
Using the Block Editor for this is much easier as it provides a native functionality for setting duotone filters, which Elementor currently lacks.
So, let's get started!
First, create your SVG duotone filter in the Block Editor
Create a new post or page using the Block Editor.
Then, insert an image block and upload or select the image you want to apply the duotone filter to.
Click on the image to reveal its settings. In the settings panel, find and select the Duotone Filter option. Set it up as you wish.

Now, save and view the post to extract the SVG filter code
Visit your post on the front end.
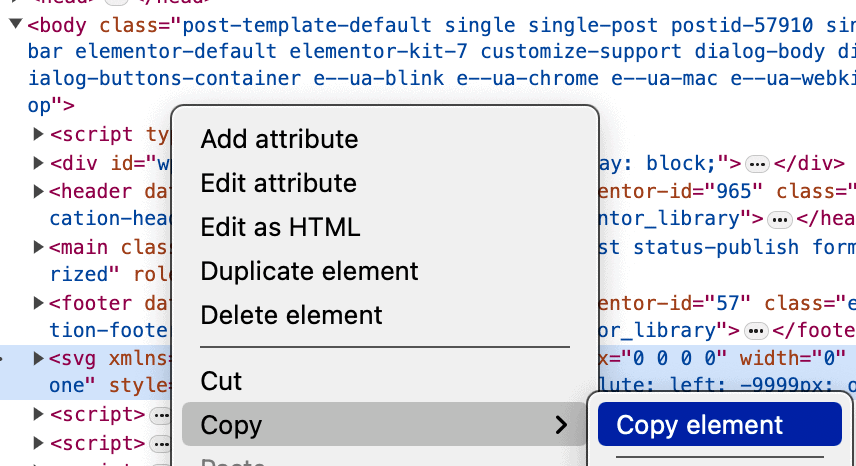
Right-click on the image with the duotone filter and select "Inspect" to open the browser's developer tools.
In the Elements panel, collapse the HTML tree until you find the SVG element associated with your duotone filter. This is usually located just above or below the <footer> or <script>s elements.
Right-click on the SVG element and select "Copy" > "Copy element".
Then, add the Duotone Filter to Your Elementor Page
Go to the Elementor editor and open the page where you want to use the duotone filter.
Insert an HTML Element and paste the copied SVG element in it.
It can be anywhere on the page, it doesn't really matter.
Under Advanced, set the position of the HTML element to absolute to be certain it doesn’t take up any unnecessary space in the layout.
Use the Navigator to rename the HTML element to something like "duotone-SVG" for better identification.
Apply the Duotone Filter Using Custom CSS
Go back to the Block Editor's page and inspect the image with the duotone filter again.
Locate the CSS rule that applies the filter, which typically looks like filter: url(#filter-id).
Copy the filter: url(#filter-id) rule from the Block Editor's image's CSS rules.
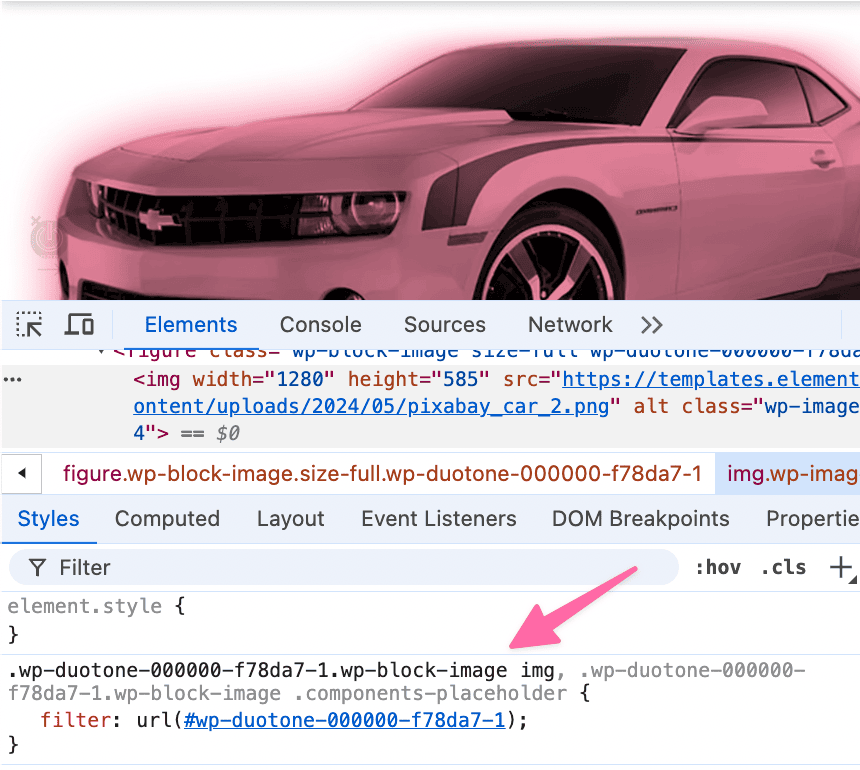
So where we are copying this part:
filter: url(#wp-duotone-000000-f78da7-1);
In the Elementor editor, navigate to the Advanced settings of the image you want to apply the filter to. Go to theCustom CSS section and paste this there:
<script>
/* Please login to get the code
 * The code will be for the Elementor Image Filter Effect: SVG DuoTone Filters tutorial
 * Found at this URL https://element.how/elementor-image-filter-effect-svg-duotone-filters/
 */
</script>
Be certain to replace the filter URL with your own.
To have the duotone applied on an entire container, you would add this CSS to che container's Custom CSS field:
<script>
/* Please login to get the code
 * The code will be for the Elementor Image Filter Effect: SVG DuoTone Filters tutorial
 * Found at this URL https://element.how/elementor-image-filter-effect-svg-duotone-filters/
 */
</script>
Adjust the Selector as Needed:
If you want the filter to apply to multiple elements or a specific part of your layout, adjust the CSS selector accordingly. For instance, to target a specific class or multiple images, you can modify the selector:
<script>
/* Please login to get the code
 * The code will be for the Elementor Image Filter Effect: SVG DuoTone Filters tutorial
 * Found at this URL https://element.how/elementor-image-filter-effect-svg-duotone-filters/
 */
</script>
This will target all <img> elements that have a parent with the class .my-custom-class.
Watch the video to learn more and to learn about using this in Elementor Free.
Conclusion
That's it! You've successfully applied a duotone filter created in the Block Editor to an element in Elementor.
This method leverages the great duotone capabilities of the Block Editor and allows you to reuse them within Elementor.
I hope you found this tutorial helpful.
Cheers!